Contents
- What must a hoodie tech pack contain?
- How do you spec a hoodie hood?
- What hood construction options should the te…
- Why does the kangaroo pocket go wrong so oft…
- What rib composition and recovery should a h…
- What fleece and rib construction should the…
- How do you spec the drawcord and eyelets?
- How does a zip hoodie tech pack differ from…
- What points of measure does a hoodie need?
- How is a hoodie tech pack inspected on the l…
- What should you hand a knit or fleece factory?
- How do you make a hoodie tech pack, step by…
- Frequently asked questions
- The bottom line

A hoodie is usually the first thing a streetwear founder ever makes. It looks simple. Two panels, a hood, a pocket, some rib. That simplicity is exactly why it gets rejected. A complete tech pack runs eight core sections, from flat sketches to construction notes (Techpacker), and a hoodie tests almost every one of them at once.
I run a network of clothing factories in Portugal. I've watched good hoodie samples come off the line wrong, not because the design was bad, but because the hood was undefined, the rib had no recovery spec, or the pouch sat two centimetres off. This guide walks the whole garment, hood to hem, and shows where hoodies specifically fail.

Key Takeaways - A hoodie tech pack needs the same 8 sections as any garment, but the hood, rib, and pouch carry most of the risk. - Hoodies fail on hood proportion and rib recovery more than anything else. Both are measurable, and both get left vague. - Spec rib by composition and recovery, not just "ribbed cuffs." Elastane content drives whether cuffs bounce back or bag out. - Bar-tack every pouch pocket stress point and dimension the placement, or the pocket lifts on the first wear. - Inspection runs at AQL 2.5 for consumer goods (QIMA), so every hood and rib measurement needs a tolerance.
New to the format? Start with what a tech pack actually contains, then come back here for the hoodie specifics. If you just want the fields, grab the free tech pack template and fill it as you read.
What must a hoodie tech pack contain?
A hoodie tech pack contains the same eight sections as any production spec: flat sketches, bill of materials, measurement specs, cost sheet, size gradings, colorways, construction notes, and revision history (Techpacker). Nothing about a hoodie lets you skip one. The garment just loads more detail into a few of them.
Here's the difference from a tee. A hoodie has a hood, a pouch pocket, drawcords, eyelets, and rib at three points. Each of those is a sub-assembly with its own measurements, materials, and construction. So the flat sketch needs callouts a tee never has. The BOM lists cord, tipping, and eyelets. The POM table grows a hood section. The spec doesn't change shape. It gets deeper.
Citation capsule: A complete tech pack contains eight standard sections: flat sketches, bill of materials, measurement specs, cost sheet, size gradings, colorways, construction notes, and revision history. A pullover hoodie tech pack uses all eight, loading extra detail into the flats, BOM, and points of measure for the hood, pouch, and rib.
How do you spec a hoodie hood?
The hood is where hoodies fail first. Inspection measures a finished garment against your stated numbers at AQL 2.5 for consumer goods (QIMA), so an undefined hood is an unmeasurable hood. Spec three things: hood height, hood width at the opening, and the crown or centre-back seam shape.
Hood proportion is the single detail that reads "cheap" or "considered" from across a room. Too short, and it won't sit over the head. Too wide at the face, and it collapses flat on the shoulders. I've seen a hood pass every other measurement and still get rejected on approval, because it looked wrong on the body. Give the hood its own flat, drawn from the side and the front, with height and opening width dimensioned.
Most first hoodie specs treat the hood as one measurement. It isn't. A hood is a three-dimensional shape defined by height, opening width, and the seam that builds the crown. A two-panel hood and a three-panel hood at the same height sit completely differently on the head, and only the construction note tells them apart.
Citation capsule: A finished hoodie is inspected against its stated measurements using AQL sampling, commonly 2.5 for general consumer goods. Hood height, opening width, and crown construction each need their own dimensioned callout, because an inspector can only check the hood proportions your tech pack actually defines.
What hood construction options should the tech pack call out?
Hood construction is a decision the tech pack makes, not one it hands to the factory. The finished hood gets measured against a block sized from body-measurement tables like ASTM D5585-21 (ASTM), so panel count, lining, and the cord channel all change how that block sews up. Call out four things: panels, lining, channel, and the body attachment.
Two-panel vs three-panel hood
A two-panel hood joins on one centre-back seam. It's cheaper, sits flatter, and tends to fall onto the shoulders when it's down. A three-panel hood adds a centre gusset running crown to nape, which builds height and holds the hood upright off the back. The panel count does more for perceived quality than any single measurement, yet it lives in one line of the construction notes. Dimension the gusset width on a three-panel, or the factory guesses it.
Lined vs unlined hood
An unlined hood is a single fleece layer with its inside seams overlocked and on show. A self-lined or jersey-lined hood doubles the fabric, hides the seams, and adds warmth, plus cost and weight. If you line it, list the lining fabric in the BOM and note how the two layers meet at the opening: bagged out and turned, or bound. A contrast lining is a design feature and a second colourway line.
Drawcord channel and eyelets
The channel is the tunnel the cord runs through at the hood opening, either a folded-back self facing or an applied binding. Spec its finished width so it clears the cord and lets it slide. Then decide the cord exit: metal eyelets, self-fabric eyelets, a machine buttonhole, or no exit at all on a hidden-cord hood where the cord is caught in the seam. Dimension eyelet placement from centre front, and state nickel-free if the eyelets are metal.
Hood-to-body attachment
The hood joins the body at the neckline, and that seam is where twisting starts. Note whether the hood sews to a bound neckline, to a neck rib, or to a facing, and whether the seam is taped to stop it stretching. Match the hood and body notches in the pattern. Most twisted-hood samples I've sent back weren't a sewing fault. They were a notch that never made it onto the flat.
Citation capsule: A hoodie hood is defined by four construction choices the tech pack must state: panel count (two-panel flat versus three-panel with a crown gusset), lining, the drawcord channel and its cord exit, and the neckline attachment. Each maps to a body-measurement block, so an inspector can only verify what the construction notes actually name.
Why does the kangaroo pocket go wrong so often?
The pouch pocket fails on two things: placement and stress points. Construction notes are one of the eight core tech pack sections (Techpacker), and the pouch needs more of them than any other part. Dimension the pocket position from the hem and centre front, then bar-tack every opening corner.
Think about what a hand does to a kangaroo pocket. It pulls down and out, hundreds of times, often with keys or a phone inside. A plain straight stitch at the pocket opening tears. A bar-tack, a short dense stitch cluster, holds. Skip the bar-tack callout and the factory may run a simple backstitch, which looks fine on the sample and lifts on the customer. Placement matters too. A pouch dimensioned from the waist but drawn at the hip becomes two different garments.
Spec these for the pouch: opening height and width, distance from hem, distance from centre front, and a bar-tack at every stress corner. Note the topstitch distance so the visible line matches your intent.
I've had a batch flagged because the pouch pockets sat a couple of centimetres high across the run. The tech pack dimensioned the pocket from the centre front but never from the hem, so the factory placed it by eye. Every unit was internally consistent. None of them matched the sample the founder had approved. That gap cost a re-cut nobody wanted to pay for.
What rib composition and recovery should a hoodie spec?
Rib is the second big failure point, right behind the hood. The bill of materials must pin down every component, not just the shell (Sewport), and rib is a separate component with its own composition. Spec the rib by fibre split, including elastane percentage, plus the rib depth at cuff, hem, and neck.
Recovery is the word that matters. Recovery is how well the rib springs back after it stretches over a hand or a head. Cotton rib with no elastane stretches once and stays stretched, so cuffs bag out and the hem waves. A few percent elastane changes everything. Cuffs grip, the hem holds its line, and the garment still looks new after twenty washes. "Ribbed cuff" is not a spec. "2x2 rib, 95/5 cotton/elastane, 6 cm cuff depth" is.
Citation capsule: The bill of materials specifies every garment input, not only the main fabric. On a hoodie, the rib at cuff, hem, and neck is a distinct component. Its fibre composition, especially elastane content, determines recovery, meaning whether cuffs spring back or bag out after repeated wear and washing.
What fleece and rib construction should the BOM lock down?
Fleece and rib are the two knits that decide whether a hoodie feels premium or cheap, and both grade with the size run on body-based increments, the same principle behind ASTM body-measurement tables (ASTM). Lock the fleece by construction and weight, and the rib by gauge and elastane, before the mill buys a single cone of yarn.
Loopback vs brushed-back fleece
Loopback fleece, also called French terry, leaves the knit loops uncut on the inside. It's lighter, more breathable, and reads clean for year-round streetwear. Brushed-back fleece sands those loops into a soft nap, so it's warmer, bulkier, and sheds more in the early washes. The two look almost identical from the face. Name which one in the BOM, because a factory will default to whatever's on the shelf.
GSM tiers and what they signal
Fleece weight is quoted in grams per square metre, and the tier sets the whole character of the hoodie. Roughly, 250 to 280 gsm is lightweight for layering, 300 to 340 gsm is the streetwear standard, and 380 gsm and up is heavyweight and boxy. Heavier fleece needs a firmer rib to balance it, or the cuffs look weak against the body. State a target GSM with a tolerance, not just "fleece."
Shrinkage and why it bites hoodies
Knit fleece shrinks, usually more in length than width, and a hoodie shows it fast. The disputes I see most aren't about a bad sample. They're about a good sample that shrank. Spec a maximum shrinkage after a stated wash, require a pre-production wash test, and say whether your points of measure are pre- or post-wash. A 70 cm body that comes back at 66 cm drags the pouch up and shortens the sleeves at once.
Rib gauge, structure, and the three positions
Earlier we specced rib by composition. Construction matters too. A 2x2 rib is deeper and chunkier than 1x1 and gives more surface to recover, which suits heavier hoodies. Gauge, the needles per inch, sets how fine it knits. Cuff and hem usually share one spec, but the neck rib is narrower and works hardest, because it stretches over the head on every wear. Give each position its own depth, and hold the same elastane floor across all three.
Citation capsule: A hoodie's fleece and rib each carry construction specs the bill of materials must fix: fleece as loopback or brushed-back at a target GSM with a shrinkage limit, and rib as 1x1 or 2x2 at a stated gauge and elastane floor. Both grade across the size run on body-based increments, the same body-measurement principle the points-of-measure table above applies to the hood and rib rows.
How do you spec the drawcord and eyelets?
Drawcords and eyelets live in the bill of materials, which lists every trim and component beyond the shell fabric (Sewport). Spec the cord type, width, length, and tipping, plus the eyelet or grommet material, inner diameter, and finish. These small parts sink an otherwise clean hoodie sample surprisingly often.
Cord and eyelet failures are quiet but real. A cord cut too short won't tie once the hood cinches. Metal eyelets that aren't specified as nickel-free can fail compliance testing in some markets. A cord with no tipping, the reinforced end, frays and won't thread back through the eyelet after the first wash. And if the eyelet inner diameter is smaller than the cord, the cord jams. Name each part. Note whether eyelets are metal or self-fabric, and whether the cord is flat or round.
Citation capsule: A hoodie's drawcord, tipping, and eyelets are trim components that belong in the bill of materials alongside the shell fabric and rib (Sewport). Each needs its own line: cord type, width, length, and tipping, plus eyelet material, inner diameter, and finish, so the factory sources the exact trim rather than substituting what's on hand.
How does a zip hoodie tech pack differ from a pullover?
A zip hoodie keeps all eight sections but rebuilds the entire centre front. Where a pullover has an unbroken body and a kangaroo pouch, a full-zip splits the front, adds a separating zipper, a placket, and usually two hand pockets. That extra hardware is why a zip style sits toward the top of the 500 to 2,000 dollar tech pack range (Guru, 2022).
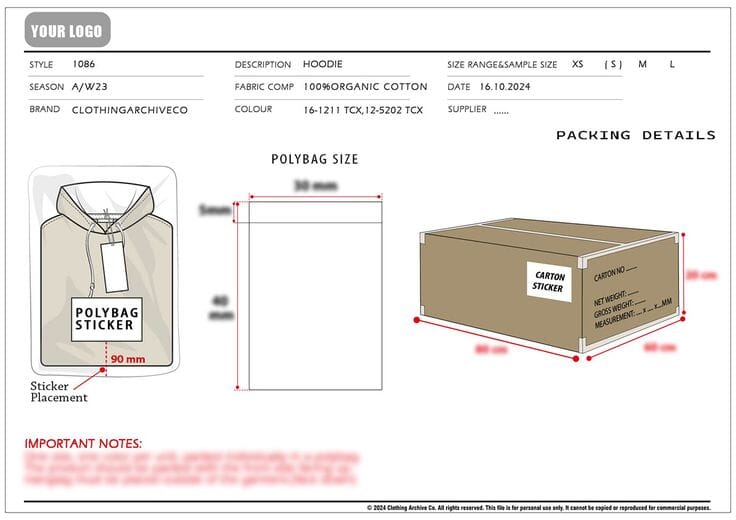
Spec the zip first, because everything else hangs off it. A full-zip hoodie needs a separating (open-ended) zip so both halves part completely. Name the type: coil nylon for light, flexible zips, moulded plastic for a chunkier streetwear look, or metal for weight. Give the chain gauge too, where #3 is fine, #5 is the mid-weight default, and #8 is heavy. Call out the brand tier and the colour of both tape and teeth.
Then dimension the zip length. It has to match the finished front length on the zip side, hem to the top of the collar or hood seam. A zip a centimetre off is one of the quieter reject reasons I've seen. The placket buckles or the hem gapes, and no measurement on the sheet catches it, because nobody dimensioned the zip. Grade the zip length per size like any other point of measure.
Also spec for a zip hoodie: the placket width and whether it's topstitched; a stay tape or interfacing behind the placket so the knit front doesn't wave; an optional storm flap behind the teeth and a garage at the top to stop chin catch; two hand pockets with opening, bag depth, and bar-tacks in place of the pouch; and a bar-tack at the base of the zip.
Citation capsule: A full-zip hoodie tech pack swaps the pullover's kangaroo pouch for a separating zipper, a stabilised placket, and two hand pockets. The spec adds zip type, chain gauge (#3, #5, or #8), and a dimensioned zip length graded per size, so the factory sources the exact hardware instead of substituting a closed-end zip.
What points of measure does a hoodie need?
A hoodie needs a fuller points-of-measure table than most garments, because the hood and rib add rows a tee never has. Grading those points follows body-based increments, the same logic behind ASTM body-measurement standards maintained by Subcommittee D13.55 (ASTM). Every row below needs a base measurement and a tolerance.
The table shows an illustrative POM list for a pullover hoodie at base size M. Treat the numbers as a worked example, not a standard to copy. Your fit, block, and fabric set the real values. What matters is the structure: a measurement and a tolerance on every line, including the hood and rib rows that first-time specs skip. A good format keeps this table readable under time pressure on the line.
| Point of measure (illustrative) | Base size M | Tolerance |
|---|---|---|
| Chest width (1 cm below armhole) | 58 cm | ±1.25 cm |
| Body length (HPS to hem) | 70 cm | ±1.5 cm |
| Across shoulder | 52 cm | ±1 cm |
| Sleeve length (from CB) | 85 cm | ±1 cm |
| Hood height (crown to opening) | 36 cm | ±0.75 cm |
| Hood opening width | 24 cm | ±0.75 cm |
| Cuff rib depth | 6 cm | ±0.5 cm |
| Hem rib depth | 6 cm | ±0.5 cm |
| Neck rib width | 2.5 cm | ±0.5 cm |
| Pouch opening (from hem) | 10 cm | ±0.5 cm |
Here's how those rows grade, because grading isn't one percentage across the board. Chest and body length move most between sizes, often a couple of centimetres a step. Hood height and opening grade in far smaller increments, because heads vary much less than chests. Rib depths at cuff and hem usually hold constant across the whole run, graded by zero, while the rib's circumference grows with the opening it finishes. Neck rib width often stays fixed too. Grading each row at its own rate is what keeps a size XS and a size XXL both reading as the same hoodie.
Citation capsule: Grading a hoodie's points of measure follows body-based increments, the principle behind ASTM body-measurement tables maintained by Subcommittee D13.55 (ASTM). Each point, including hood height and rib depth, grades at its own rate rather than by a single global percentage, so fit holds across the whole size run.
How is a hoodie tech pack inspected on the line?
A finished hoodie is inspected by sampling, not by checking every unit. Inspectors pull a sample using standards like ISO 2859-1, mirrored by ANSI/ASQ Z1.4, and measure each garment against your spec. Consumer apparel is commonly checked at AQL 2.5, with 1.0 for higher-risk items and 4.0 for minor cosmetic faults (QIMA).
Here's why this shapes your tech pack. Every measurement you list is checked against the tolerance you set. A hood height 2 cm off tolerance counts as a defect. Enough defects, and the batch fails against the AQL. Critical defects sit at zero, no exceptions. So the tech pack isn't paperwork you send and forget. It's the exact document a stranger with a tape uses to accept or reject your production run. Leave the hood or rib undefined, and you've handed that decision away.
If you'd rather not build the document alone, our tech pack service turns your hoodie design into a factory-ready spec for $299, hood and rib detail included. For a full catalogue of failure modes, the common mistakes guide covers what gets garments rejected across every category.
Citation capsule: Garment inspection uses sampling standards such as ISO 2859-1 (mirrored by ANSI/ASQ Z1.4). Consumer apparel is commonly inspected at AQL 2.5, with 1.0 for higher-risk items and 4.0 for minor cosmetic faults; critical defects sit at zero. Each hoodie measurement is checked against your stated tolerance to accept or reject the batch.
What should you hand a knit or fleece factory?
Hand the factory the complete pack, not a mood board and a photo. A tech pack takes roughly 5 to 20 hours to build for a reason (Guru, 2022): it front-loads every call a knit factory would otherwise make for you. With a hoodie, that means the eight sections plus a few physical things a screen can't carry.
Send fabric evidence, not adjectives. A knit or fleece factory needs the actual quality confirmed: a hanger or header of the exact loopback or brushed fleece and the rib, ideally with GSM and the knit structure, so what they order matches what you approved. Attach the cord and eyelet trims or their precise specs. Include an approved measurement set or a reference garment they can copy, plus a fit-comment sheet so your tolerances read as intent, not suggestion.
The briefs that sample right on the first round, in my network, are the ones that arrive with a physical fabric reference clipped to a full POM. The ones that bounce describe the fabric in words and hope the mill pictures the same thing.
Citation capsule: A knit factory needs more than the eight-section document to sew a hoodie right the first time. Alongside the pack, hand over a physical fabric and rib reference with GSM and knit structure, the cord and eyelet trims, an approved measurement set or reference garment, and a fit-comment sheet, so the mill matches the approved sample instead of guessing.
How do you make a hoodie tech pack, step by step?
Building a hoodie tech pack costs less than one rejected run. Independent estimates put a professional tech pack at 500 to 2,000 dollars per style, taking roughly 5 to 20 hours (Guru, 2022). Work through the eight sections in order, loading the hood, pouch, and rib with the detail this guide covers.
Follow these steps to build a complete pullover hoodie tech pack:
- Draw the flats. Front, back, and a separate hood detail from the side and front. Add callouts for the pouch, cord, and eyelets.
- Build the bill of materials. Shell fabric with GSM and composition, rib with elastane percentage, cord, tipping, eyelets, thread, and labels.
- Fill the points of measure. Every row a base size and a tolerance, including hood height, opening width, and rib depth at cuff, hem, and neck.
- Write the construction notes. Seam types, stitches per inch, topstitch distances, and a bar-tack at every pouch stress corner.
- Set the colourways. A named or Pantone reference for shell, rib, cord, tipping, and thread, kept separate.
- Add grading and revision control. Grade point by point, then put a revision number and date on every page. One live version.
Start from the free tech pack template so the fields are already there. When you're ready to produce, you can find a manufacturer through Portugal Clothing Factory, which works from exactly this kind of complete spec.
Frequently asked questions
What is a hoodie tech pack?
A hoodie tech pack is the full build spec for a pullover or zip hoodie: flat sketches, bill of materials, measurements, construction, colourways, grading, and revisions. It contains the same eight core sections as any garment tech pack, with extra detail for the hood, pouch pocket, and rib.
Where do hoodies fail most often in production?
Hoodies fail most on hood proportion and rib recovery. An undefined hood height or opening width can't pass inspection, which measures against your stated numbers at AQL 2.5 for consumer goods. Rib without an elastane spec bags out after washing. Both are measurable, and both get left vague.
How is a hoodie tech pack different from a sweatshirt tech pack?
The structure is identical. A sweatshirt tech pack drops the hood section and its callouts, so it's a shorter document. Everything else carries over: rib composition and recovery, pouch or pocket detail, points of measure, and construction notes. Both are inspected the same way against your stated tolerances.
How much does a hoodie tech pack cost?
Independent estimates put a professional tech pack at roughly 500 to 2,000 dollars per style, taking 5 to 20 hours to build (Guru, 2022). A hoodie sits toward the higher end because of the hood, cord, and rib detail. A complete template lowers both the time and the cost.
Do I need to spec rib recovery in the tech pack?
Yes. Rib recovery depends on composition, and the bill of materials must pin down every component (Sewport). Spec the rib fibre split, including elastane percentage, plus depth at cuff, hem, and neck. Without it, the factory may use cotton-only rib that stretches once and never springs back.
What's the difference between a zip and pullover hoodie tech pack?
A zip hoodie splits the centre front, so the tech pack swaps the kangaroo pouch for a separating zipper, a stabilised placket, and usually two hand pockets. Zip type, chain gauge, and a dimensioned zip length all get their own spec lines. A pullover keeps an unbroken front and the pouch. Both use the same eight sections.
What GSM should hoodie fleece be?
Common hoodie fleece runs about 250 to 280 gsm for lightweight, 300 to 340 gsm for the streetwear standard, and 380 gsm or more for heavyweight. State a target GSM with a tolerance in the bill of materials, and note whether the fleece is loopback or brushed-back, because the two feel and wash differently.
How many panels should a hoodie hood have?
Two-panel and three-panel hoods are both standard. A two-panel hood has one centre-back seam and sits flatter. A three-panel hood adds a centre crown gusset that builds height and holds the hood upright. Name the panel count in the construction notes, and dimension the gusset on a three-panel hood.
The bottom line
A hoodie looks like a beginner's garment and behaves like an advanced one. The hood is a three-dimensional shape, the rib is an engineered component, and the pouch takes real stress on every wear. Spec each one with numbers a tape can check, and most hoodie rejections disappear before the first panel is cut.
Work the eight sections in order. Give the hood its own flat and dimensions. Spec rib by composition and recovery, not by adjective. Bar-tack the pouch and dimension its placement from the hem. Name every cord and eyelet. Then put a tolerance on every measurement, because that's what inspection checks. Start from the pillar guide for the full system, or grab the free tech pack template and build your hoodie spec today.
Peter Midea runs a network of 80 clothing factories in Portugal and has watched more garments get rejected on a production line than he'd like to admit.
We build the factory-ready spec a manufacturer can quote from without a single question: technical flats, bill of materials, graded points of measure with tolerances, colorways and construction notes. $299 per style, 3 to 5 working days, 2 to 3 revision rounds.
Get your tech pack — $299Start with the free templateWe don't take your production. The spec is yours to send to any factory, anywhere. Talk to us first if you're not sure what you need.
Sources
Every statistic and definition in this article traces to one of the following. Each is listed once here, and cited inline where it is used.
- Techpacker
- images.pexels.com
- QIMA
- ASTM International
- Sewport
- ASTM International
- Guru
- otextilpt.sirv.com
- Portugal Clothing Factory
Related guides
- Tech packs: the complete guide
- T-shirt tech pack
- Sweater & knitwear tech pack
- Sweatpants & shorts tech pack
- Streetwear tech pack
- Free tech pack template