Contents
- Why do factories reject tech packs at all?
- Which tech pack mistakes cost the most?
- Mistake 1: No tolerance column
- Mistake 2: Vague materials
- Mistake 3: No grading rules
- Mistake 4: Flat grading
- Mistake 5: Sketch and measurement mismatch
- Mistake 6: Missing points of measure
- Mistake 7: No construction or stitch detail
- Mistake 8: No revision number or version con…
- Mistake 9: Colour by picture, not reference
- Mistake 10: Beautiful but unmeasurable
- Mistake 11: Wrong format for a factory
- Mistake 12: Ambiguous or missing units
- Mistake 13: No seam allowance
- Mistake 14: No sealed reference sample
- Mistake 15: Over-tight tolerances
- Mistake 16: No base size marked
- Tech pack mistakes at a glance
- How do you self-audit a tech pack before sen…
- Frequently asked questions
- The bottom line

Tech packs get rejected for one reason above all others: the factory cannot build "correct" when nobody has defined it. A missing number, a vague fabric, a size that only exists in one measurement. Each gap becomes a decision the cutting room makes for you. And the factory's guess is rarely the one you wanted. For the measuring itself, see our guide on how to measure garments.
I lead technical development for the brands GarmentSpec works with. I've stood on the line and watched good ideas turn into rejected garments, not because the design was wrong, but because the paperwork left a hole. The mistakes below are the ones I see again and again. None of them are about talent. All of them are fixable before a single panel is cut.
Key Takeaways
- Most rejections trace to missing definitions, not bad design. If a tape can't check it, the factory can't hit it.
- A tolerance column is the single most common omission. Without it, AQL inspection has no accept/reject baseline (QIMA, on ISO 2859-1).
- Grade every point of measure, not one flat increment. Collars gape and armholes bind when every POM grows by the same number.
- Version control matters as much as design. A superseded file on the cutting table produces a whole batch you must pay for.
- A complete tech pack template prevents most of these before you ever email a factory.
Before we go mistake by mistake, one definition. A tech pack is the full build spec for a garment: measurements, materials, construction, colour, and grading. If you're new to the format, start with what a tech pack actually contains, then come back here for the failure modes. For the size chart itself, try our size chart generator.
Why do factories reject tech packs at all?
Factories reject work because inspection runs on numbers, not intentions. Consumer apparel is usually checked at AQL 2.5, with 1.0 for higher-risk items and 4.0 for minor cosmetic faults (QIMA). Critical defects sit at zero. Every one of those thresholds needs a target and a tolerance to measure against.
Here's the mechanism. An inspector pulls a sample using ISO 2859-1 sampling. They measure each garment against your spec. If a measurement falls outside your stated tolerance, it counts as a defect. Enough defects, and the batch fails. So when your tech pack skips the number, it doesn't skip the check. It just hands the pass/fail decision to a stranger with a tape.
Citation capsule: Garment inspection uses sampling standards like ISO 2859-1 (mirrored by ANSI/ASQ Z1.4) to decide accept or reject. Consumer goods are commonly inspected at AQL 2.5, meaning a defined number of defects fails the batch (QIMA). Every defect is measured against your spec, so a missing number becomes an undefined pass.
The insight most first-time brands miss: rejection isn't the factory being difficult. It's the factory refusing to invent the parts of your product you left blank. A good factory that guesses is a worse partner than one that stops and asks.
Which tech pack mistakes cost the most?
Not equally. The mistakes that touch fabric and grading cost the most, because they're expensive to unwind once cloth is cut. A professional tech pack runs 500 to 2,000 dollars per style (Guru, 2022), a rounding error next to a mis-cut bulk run or a wall of returns.
Think of error cost as a ladder. A gap caught in the document costs minutes. The same gap caught in a sample costs a round: two to three weeks and a sample fee. Caught in the cutting room, it costs fabric and a production slot. Caught at inspection, it costs the batch. Caught by the customer, it costs a return, and US shoppers sent back 890 billion dollars of goods in 2024 (NRF). Every rung up, a zero gets added.
This is why tolerance, materials, and grading sit at the top of the list. They're the mistakes most likely to survive undetected until fabric is committed. Format and colour errors tend to surface earlier, in review or sampling, where they're cheaper to fix. Order your own audit by how late each mistake can hide.
Mistake 1: No tolerance column
This is the single most common omission, and the most damaging. A tolerance column tells the factory how much a finished measurement may vary and still pass. Without it, the word "correct" has no meaning, and AQL inspection has no baseline to accept or reject against.
Think about what a tolerance actually does. You spec a 100 cm chest. Cloth relaxes, shrinks, and stretches. No two cut panels are identical to the millimetre. A tolerance of plus or minus 1 cm says a 99 to 101 cm chest passes. Leave it out, and either the factory invents a tolerance you never agreed to, or it flags every tiny deviation. Both outcomes cost you.
Why do brands skip it? Because a single target number feels precise enough. It reads finished. The tolerance is the invisible half of the spec, the part you only miss once a batch comes back. New brands copy a measurement chart, see clean numbers, and never notice the column that isn't there.
The consequence lands at inspection. Say grade and cloth relaxation push a run of chests to 101.4 cm. With a plus or minus 1 cm tolerance, those pass. With no tolerance, the inspector defaults to the factory's house figure, often tighter than you'd have agreed, and a chunk of the run books as measurement defects. Cross the AQL 2.5 limit and the whole batch fails, on a number you never actually set.
The fix: add a tolerance to every point of measure. Tighter on necks and plackets, looser on sweeps and lengths.
Mistake 2: Vague materials
A fabric named "cotton" is not a specification. It's a category. GSM, composition, and construction change how a garment cuts, drapes, shrinks, and survives a wash. When the bill of materials is vague, the factory sources whatever "cotton" it has, and your sample arrives in the wrong hand entirely.
The bill of materials should pin down every input, not just the shell (Sewport). Fibre split, weight in grams per square metre, weave or knit type, and finish. A 180 GSM single jersey behaves nothing like a 220 GSM interlock. Buttons, thread, interlining, and labels belong here too. Each one is a variable you either control or surrender.
Why it happens: fabric feels like the designer's domain, not the spec's, so "cotton jersey" gets typed and the detail waits for later. Later never comes. The factory has to order yarn or greige to start sampling, so it fills the blank with whatever matches the word on hand.
The cost shows up as a wrong fabric cut. A 180 GSM tee spec'd only as "cotton" comes back in 220 GSM, because that's what was in the warehouse. The hand is wrong, the drape is wrong, and you've burned a sample round plus two to three weeks waiting for it. If the vagueness survives to bulk, you're cutting hundreds of units in the wrong cloth, and that's not a re-sample, that's a write-off.
The fix: write composition, GSM, and construction for the shell and every trim. Name the yarn if it matters.
Mistake 3: No grading rules
A tech pack with measurements for one size is a spec for one size. If you don't supply grading rules, the factory builds your size range by guessing the increments, and your fit falls apart at the ends of the run. The middle size looks fine. The XS and the XXL don't.
Grading is a discipline with published standards behind it. ASTM International maintains body measurement tables through Subcommittee D13.55, including ASTM D5585-21 for straight sizes 00 to 20 and ASTM D6960/D6960M for plus sizes 14W to 40W. These exist precisely because a size range is not one measurement stretched by feel.
Citation capsule: Size grading follows published body-measurement standards. ASTM D5585-21 covers women's straight sizes 00 to 20, and ASTM D6960/D6960M covers plus sizes 14W to 40W, both maintained by ASTM Subcommittee D13.55 (ASTM). Supplying grading rules keeps fit consistent across every size instead of leaving the ends to a factory's default.
Brands skip grading because the sample fits, so the range feels solved. One good size reads like proof. It isn't. Grading is a separate step from fitting the base size, and a factory without your rules applies a generic grade that ignores your block's proportions.
The consequence is a size run that fits in the middle and fails at the ends. Your returns cluster at XS and XXL, the sizes furthest from the base, and you won't see it until customers do. By then you've cut, sewn, and shipped a whole graded run built on a guess, so the fix is a recall, not a re-spec.
The fix: include a graded spec sheet with increments for every point of measure, across every size.
Mistake 4: Flat grading
Flat grading looks like a shortcut and behaves like a trap. Adding the same increment to every point of measure, then scaling everything by a single percentage, breaks fit at the extremes. Necklines gape. Armholes bind. At 115% your XL reads like a stretched S, because a neck and a hip do not grow at the same rate.
This one comes from software convenience. A "scale to 115%" button is right there, and it looks like grading. It isn't. Uniform scaling treats a neck and a hip as if they grow together, and human bodies don't work that way.

Real grading assigns each point of measure its own rule. A collar grows a few millimetres between sizes. A chest grows far more. The published ASTM tables reflect this, because human bodies don't scale uniformly. When you flat-grade, you flatten that logic, and the garment tells on you the moment someone tries it on.
The fix: grade point by point using body-based increments, never one global percentage.
Mistake 5: Sketch and measurement mismatch
When the flat sketch says one thing and the POM table says another, the factory has to pick a winner. Sometimes it picks the drawing. Sometimes the numbers. Either way, half your intent is gone before cutting. A patch pocket drawn at the hip but dimensioned at the waist is two different garments.
This one hides in plain sight, because each half looks fine alone. The mismatch only appears when someone reads both at once, and on a busy line, nobody has time to referee your document. The sketch and the measurement table must agree on every callout, every seam, every placement.
The mismatch creeps in during edits. You move a pocket on the sketch, forget to update the number, and now two "finished" documents disagree. On the line, the factory builds whichever it reads first. If it builds the drawing, your dimension is wrong. If it builds the number, your sketch lied. Either way you get a sample that matches neither what you drew nor what you meant, and another round gone.
The fix: cross-check the flat against the POM table before you send. If they disagree, the tech pack isn't finished.
Mistake 6: Missing points of measure
A garment is only as controlled as its list of points of measure. Skip the hard ones, and you lose the fit exactly where it's most visible. Armhole depth, across-back, neck drop, and front rise are the usual casualties, because they're awkward to self-measure and easy to forget.
Brands skip the hard POMs because they're hard. Armhole depth and across-back are awkward to measure on a flat, so they quietly fall off the chart. The easy widths stay; the fit-critical ones vanish. Nobody decides to omit them, they just never get added.
Here's why the gaps hurt. An inspector can only check what you've listed. Leave out armhole depth, and the factory can build a binding armhole that still "passes" your spec, because your spec never mentioned it. That garment ships, then comes back as a return you can't blame on the factory. The most-skipped measurements are almost always the ones a customer feels first. See a worked example tech pack for a full POM list done properly.
The fix: measure and list every POM, especially the awkward ones. If you can't measure it, you can't approve it.
Mistake 7: No construction or stitch detail
A tech pack without construction detail specifies a shape, not a garment. Seam type, stitch density, topstitch distance, and label placement all change how the piece looks, feels, and lasts. Leave them blank, and the factory applies its house defaults, which may not be yours.
Construction is one of the standard sections of a complete tech pack. Stitches per inch affects seam strength and stretch. Topstitch distance changes the whole visual line of a collar or placket. Label placement is a returns issue as much as a branding one. None of it is optional if you care how the garment reads.
Construction gets skipped because it's invisible in a flat sketch. The drawing shows a silhouette, not a seam class, so brands assume the shape carries the instruction. It doesn't. A factory reads a blank as permission to use its house standard, and its default seam may be a serged edge where you wanted a flatlock. The result fits but wears wrong: seams that grin under stress, topstitching a couple of millimetres off, a label sewn where it scratches. None of it fails a width check, so it ships. Then it comes back.
Citation capsule: Construction and stitch detail form one of the core sections of a complete tech pack, alongside measurements, BOM, and colourways. Seam type, stitch density, topstitch distance, and label placement determine how a garment wears and looks, so omitting them lets the factory default to specifications you never chose.
The fix: specify seam types, SPI, topstitch distances, and every label and trim placement.
Mistake 8: No revision number or version control
Version control isn't admin. It's a defence against building the wrong garment at full scale. Without a revision number and date on every page, a factory can cut from a superseded file, and you pay for a batch built to instructions you already replaced.
It gets skipped because it feels like paperwork, not design. Nobody was ever excited to add a revision box. But the box is the one thing that stops a factory cutting from last month's file, and the consequence of the missing box is a whole run built to a spec you'd already killed.
I've seen it happen from the factory side more than once: the file that reaches the cutting table is not the latest one. Somebody emailed a "final" version, then a "final final" the next day, and the wrong one printed. The garment matched a real spec. Just not the current one. Version control is boring right up until it costs you a production run.
The fix: put a revision number and date on every page. Kill old versions. One live file, clearly marked.
Mistake 9: Colour by picture, not reference
A colour shown only as a photo is not a specified colour. Screens shift, prints drift, and lighting lies. Without a Pantone code or a named, physical reference, the factory dyes to its best interpretation, and "navy" becomes a negotiation you'll lose after the cloth is already dyed.
The second half of this mistake is mixing up shell and trim. If your document shows one hero colour without separating body from rib, from thread, from label, the factory guesses which parts share it. Colourways are a standard tech pack section for a reason (Sewport). Each component gets its own named colour, or it gets the factory's.
Photos feel like enough because on your screen the colour looks exact. It won't on the factory's. Screens, printers, and daylight each shift the hue, so a picture is a suggestion, not a target. The cost is steep because dyeing happens early and in bulk. If "navy" comes back one shade off across a full dye lot, you're not fixing one garment, you're re-dyeing or accepting the run. A lab dip signed off against a Pantone reference is the cheap insurance you skipped.
The fix: give a Pantone or named reference per component. Separate shell, trim, and thread colours explicitly, and sign off a lab dip before bulk.
Mistake 10: Beautiful but unmeasurable
A gorgeous tech pack that a tape can't check is decoration, not instruction. Full-bleed photography and adjectives like "relaxed" or "slightly cropped" mean nothing on a cutting table. If a number doesn't sit behind the word, the factory can't build to it, and won't be held to it.
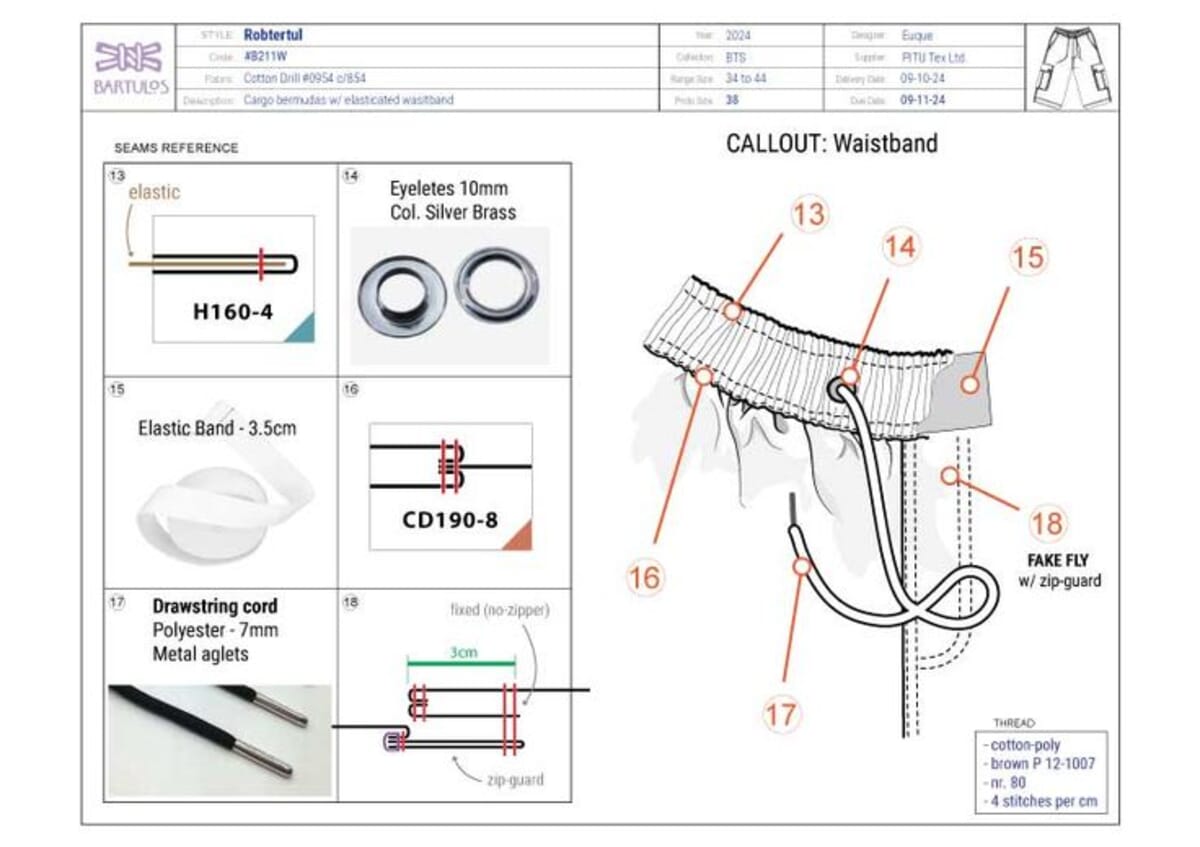
This is the trap that catches design-led founders hardest. The document looks professional, so it feels complete. Polish reads as completeness. But "oversized" is not a measurement, and "soft hand-feel" is not a fabric spec. A tape can't measure "relaxed," and an inspector can't reject to it either. Every descriptive word needs a checkable number underneath: a length, a GSM, a tolerance. Beauty is fine. Beauty without numbers is a rejected sample waiting to happen.
The fix: behind every adjective, put a number a tape or a scale can verify.
Getting this right pays off well beyond the sample. Returns are expensive at scale: US shoppers returned 890 billion dollars of merchandise in 2024, and 76% of consumers weigh free returns in where they buy (NRF). Fit failures born in a vague tech pack come back to you as returned units. If you'd rather not build the document alone, our tech pack service turns your design into a factory-ready spec.
Mistake 11: Wrong format for a factory
The right content in the wrong format still gets you rejected, or worse, silently misread. Multi-style files, landscape pages, no page numbers, and a chest measurement buried where nobody can find it in seconds all slow a factory down. On a busy line, friction becomes error.
A production tech pack is a working document, not a portfolio. One style per file. Portrait, numbered pages, a clear POM table, and the key measurements findable at a glance. A good tech pack format is built for the person reading it under time pressure, not for a design review. Format is the difference between a factory that builds fast and one that emails you five questions.
The format goes wrong because the file was built for a design review, not a cutting room. Landscape spreads and multi-style decks look great in a pitch and stall on a line. Every second a factory spends hunting for the chest measurement is a second a question email gets closer, and every question is a day added to your sampling slot.
The fix: one style per file, portrait, numbered pages, measurements front and centre.
Mistake 12: Ambiguous or missing units
A measurement without a unit is a coin flip. "Chest 40" could be 40 cm or 40 inches, and those are two completely different garments. Whenever a tech pack mixes systems or drops the unit, the factory picks one, and a 40 cm chest built at 40 inches is a tent. Body-measurement standards publish in defined units for exactly this reason (ASTM D5585-21).
Why it happens: units feel obvious to the person who wrote them. You know it's centimetres, so you don't type it. But a factory in another country runs on its own default, often the opposite of yours. Mixed files are worse, a length in inches sitting next to a width in cm on the same page.
The consequence is unrecoverable when it slips through: an entire cut in the wrong scale, fabric gone, slot gone. Even caught early, a units query costs a round of back-and-forth and a delayed sample. State the unit once in the header, then repeat it in the POM table header so nobody has to assume.
The fix: state cm or inches explicitly, use one system throughout, and label the POM table header.
Mistake 13: No seam allowance
Seam allowance is the fabric consumed inside every seam, and it's build-critical information, not a detail for the pattern room to invent. Leave it blank and the pattern maker adds a house default, often 1 cm, which quietly shifts your finished measurements and your fabric yield. Construction is a core tech pack section for a reason.
Brands skip it because seam allowance sits between design and pattern, so each side assumes the other owns it. The result is a pattern built on assumptions. If the factory's default allowance differs from your block's, the finished garment drifts from your POM table even when every panel is cut "correctly."
The production cost is quiet and real: a fit off by the sum of a dozen seam allowances, plus a fabric estimate that's wrong, which throws your costing and your order quantity. Neither failure trips a single check on the line. Both still cost you money.
The fix: state seam allowance per seam type, or a global default with the exceptions called out.
Mistake 14: No sealed reference sample
A sealed sample is the physical garment both sides agree the bulk must match. Without one, "approved" lives only in an email thread, and email doesn't survive a factory floor. Every production question then gets answered against a memory instead of an object, and memory drifts.
On our lines, the sealed sample settles arguments a document can't. When an operator asks how a collar should sit, we hold up the sealed sample, not the PDF. Brands that skip it force the factory to interpret, and interpretation creeps over a few thousand units.
The consequence is a bulk run where each garment is individually defensible against the spec, yet collectively off from what you approved. There's no reference to hold it to. You sign off a sample, the production garments slowly creep, and you've no sealed object to point at when you try to reject them.
The fix: seal, sign, and date one reference sample per style. Keep a counter-sample. Bulk matches the seal, not the sketch.
Mistake 15: Over-tight tolerances
Here's the mistake nobody warns you about: tolerances set too tight. A plus or minus 0.3 cm on a sweep sounds rigorous. In practice it manufactures defects a customer would never feel, and fails garments that are perfectly good. Every measurement outside your stated tolerance counts as a defect at inspection, whichever direction it misses.
The counter-intuitive truth: a tolerance can be too strict as easily as too loose. Brands over-tighten thinking it signals quality. It signals inexperience. Woven and knit fabrics relax and shrink within normal ranges, and a 0.3 cm window ignores physics. You'll reject a batch that a 1 cm tolerance would have passed, and that a customer would have loved.
The cost is self-inflicted rejection. You either eat the failed run, or you renegotiate tolerances mid-production, which erodes the factory's trust in your whole document. Tolerances should track the point of measure and the fabric: tight on necks and plackets, generous on sweeps, hems, and anything cut on relaxed cloth.
The fix: set realistic, POM-specific tolerances. Tight where fit is critical, generous where cloth moves.
Mistake 16: No base size marked
Grading has to start somewhere, and that somewhere is the base size. If your tech pack doesn't mark which size the pattern and sample were built at, the factory doesn't know which way to grade: up, down, or both. Sizing tables are organised around defined base points for the same reason (ASTM D6960/D6960M).
Brands miss it because they think in one size, the sample size, and forget the factory needs to know that's the origin, not just one row in the chart. A graded spec with no base marked is a ladder with no ground floor.
The consequence is a grade applied from the wrong anchor. If the factory assumes your base is M and it was really S, every increment lands one size off, and the whole run mis-grades. You've supplied numbers, but not the reference point that makes them mean anything.
The fix: mark the base size clearly on the graded spec. State which size the sample and pattern represent.
Tech pack mistakes at a glance
The table below maps each mistake to what a factory does when it hits the gap, and the one-line fix. Print it. Run your document against it before you send.
| Mistake | What the factory does | The fix |
|---|---|---|
| 1. No tolerance column | Invents a tolerance or flags everything | Add plus/minus to every POM |
| 2. Vague materials | Sources whatever "cotton" is on hand | Composition, GSM, construction per material |
| 3. No grading rules | Guesses increments across the size run | Supply a full graded spec sheet |
| 4. Flat grading | Scales every POM the same, breaks fit | Grade point by point, body-based |
| 5. Sketch vs POM mismatch | Picks one source, drops the other | Cross-check flat against POM table |
| 6. Missing POMs | Builds unlisted areas to its default | List every POM, including awkward ones |
| 7. No stitch detail | Applies house-default construction | Specify seam, SPI, topstitch, placement |
| 8. No version control | Cuts from a superseded file | Revision number and date on every page |
| 9. Colour by picture | Dyes to its own interpretation | Pantone or named reference per component |
| 10. Beautiful but unmeasurable | Cannot build to an adjective | A checkable number behind every word |
| 11. Wrong format | Slows down, misreads, emails questions | One style, portrait, numbered, POM upfront |
| 12. Ambiguous units | Cuts in cm or inches by its own default | State the unit, one system, in every header |
| 13. No seam allowance | Adds a house default, shifts fit and yield | Seam allowance per seam, exceptions noted |
| 14. No sealed sample | Interprets "approved" from memory | Seal, sign, date one reference per style |
| 15. Over-tight tolerances | Fails good garments as false defects | Realistic, POM-specific tolerance windows |
| 16. No base size marked | Grades from the wrong anchor size | Mark the base size on the graded spec |
The common thread across all sixteen is simple. A tech pack fails when it leaves a decision to the factory that only you should make. Fix the gaps, and most rejections disappear before the first panel is cut.
How do you self-audit a tech pack before sending it?
Run it against the failure modes, not your intentions. Most of these sixteen are omissions, not judgement calls, so a structured pass catches them in minutes. A tech pack takes roughly 5 to 20 hours to build (Guru, 2022); a self-audit adds fifteen and saves a sample round.
Go section by section. Open your POM table first. Does every row carry a tolerance, a unit, and a realistic window, not one so tight it manufactures defects? Confirm the base size is marked and every point grades on its own rule, not one flat percentage. Then open the BOM: composition, GSM, and construction on the shell and every trim, with a colour reference and a signed lab dip per component. Read the flat and the numbers side by side and check they agree on every callout.
Now the boring layer, which is where runs get lost. Is there a revision number and date on every page, one style per file, seam allowances stated, and a sealed sample called out? Miss any of these and a correct-looking document still ships wrong.
One discipline ties the whole audit together. For every field, ask a single question: can a tape, a scale, or a Pantone book check this? If the answer is no, the factory can't build it and an inspector can't pass it. Fix that field before you send. That one test catches the majority of the sixteen before they ever reach a cutting table.
Frequently asked questions
What is the most common tech pack mistake?
Missing tolerances is the most common and most costly omission. Without a plus/minus on each point of measure, "correct" is undefined, and AQL inspection has no baseline to accept or reject against (QIMA). Every other measurement error compounds from this single gap.
Why does a factory reject a tech pack instead of just fixing it?
Because a factory that fixes gaps is guessing at your intent, and its guess is rarely yours. Inspection runs on numbers against your spec, using sampling standards like ISO 2859-1. A missing number doesn't skip the check. It hands the pass/fail decision to a stranger with a tape.
How much does a proper tech pack cost?
Independent estimates put a professional tech pack around 500 to 2,000 dollars per style, taking roughly 5 to 20 hours to build (Guru, 2022). That cost sits well below a rejected production run, which is the real price of skipping it. A strong template lowers both.
Do I need grading rules if I only sell one size?
If you truly sell one size, you can skip grading. The moment you add a second size, you need grading rules, or the factory invents the increments. Published standards like ASTM D5585-21 exist because size ranges don't scale by feel (ASTM). Supply the rules yourself.
Can a good template really prevent these mistakes?
Largely, yes. Most of these sixteen are omissions, not judgement errors, and a complete tech pack template forces the fields that get skipped: tolerances, grading, construction, colour references, and version control. It won't design for you, but it stops you from sending a document with holes in it.
Can a tech pack tolerance be too tight?
Yes, and it's a costly mistake. A window like plus or minus 0.3 cm on a sweep ignores how fabric relaxes and shrinks, so it flags good garments as defects at AQL inspection. You fail a run a plus or minus 1 cm tolerance would have passed. Match tolerances to each point of measure and the cloth.
What is a sealed sample and do I need one?
A sealed sample is the physical garment both sides sign off as the standard bulk must match. You need one for any production run. Without it, "approved" lives in email, and the factory interprets your intent over thousands of units. Seal, sign, and date one reference per style, and keep a counter-sample.
Should tech pack measurements be in centimetres or inches?
Either works, but pick one and state it. The real mistake is leaving the unit off or mixing systems, because "chest 40" reads as 40 cm or 40 inches depending on the reader. Label the unit in the header and repeat it in the POM table. Body-measurement standards like ASTM D5585-21 publish in defined units for this reason.
The bottom line
None of these sixteen mistakes are about talent, and none require a design degree to fix. They're about closing the gaps that a factory would otherwise close for you, in ways you won't like once the batch is cut. Add the tolerance column. Name the fabric. Grade point by point. Number your versions. Put a checkable number behind every word.
Do that, and you stop losing the argument at inspection before it starts. The tech pack is the one document standing between your idea and a rejected sample. Build it to be measured, not admired. Start from the pillar guide if you want the full system, or grab the template and fill the gaps today. Either way, make it something a tape can check.
Peter Midea is GarmentSpec's technical lead for brand development.
We build the factory-ready spec a manufacturer can quote from without a single question: technical flats, bill of materials, graded points of measure with tolerances, colorways and construction notes. $299 per style, 3 to 5 working days, 2 to 3 revision rounds.
Get your tech pack — $299Start with the free templateWe don't take your production. The spec is yours to send to any factory, anywhere. Talk to us first if you're not sure what you need.
Sources
Every statistic and definition in this article traces to one of the following. Each is listed once here, and cited inline where it is used.
- QIMA
- Guru
- National Retail Federation
- Sewport
- ASTM International
- ASTM International
- ASTM International
- otextilpt.sirv.com