Contents
- What is a sweater tech pack?
- Why is knitwear a different tech pack from c…
- What must a sweater tech pack contain?
- How does gauge drive everything in knitwear?
- What gauge should you choose for a sweater?
- How do you spec yarn and knit structure?
- How do you spec necklines, cuffs, and hems?
- How are sweater measurements taken?
- How do you spec sweater weight, care, and pi…
- Fully-fashioned vs cut-and-sew knit: which d…
- What should you hand a knitwear factory?
- How do you inspect and approve a knit sample?
- Frequently asked questions
- Bringing it together
A cut-and-sew tech pack tells a factory how to cut and stitch fabric. A sweater tech pack has a harder job. It has to describe a fabric that doesn't exist yet, because the knit factory builds the cloth and the shape at the same time. Get the gauge wrong and every measurement on the sheet is fiction. Tech packs typically cost $500 to $2,000 per style (Guru, 2022), and a knit spec that copies a woven template wastes most of that money. This guide walks through what a sweater tech pack must contain, and where knitwear genuinely differs. Start with the tech pack pillar guide if you want the full map first.
Key Takeaways - A sweater tech pack specs the knit itself: gauge, yarn, and structure, not just measurements. - Gauge (stitches and rows per 10cm) drives every dimension, so it comes first. - Points of measure are taken relaxed, never stretched, with wider tolerances than woven. - Tech packs run $500 to $2,000 per style (Guru, 2022); a wrong gauge burns most of it.
What is a sweater tech pack?
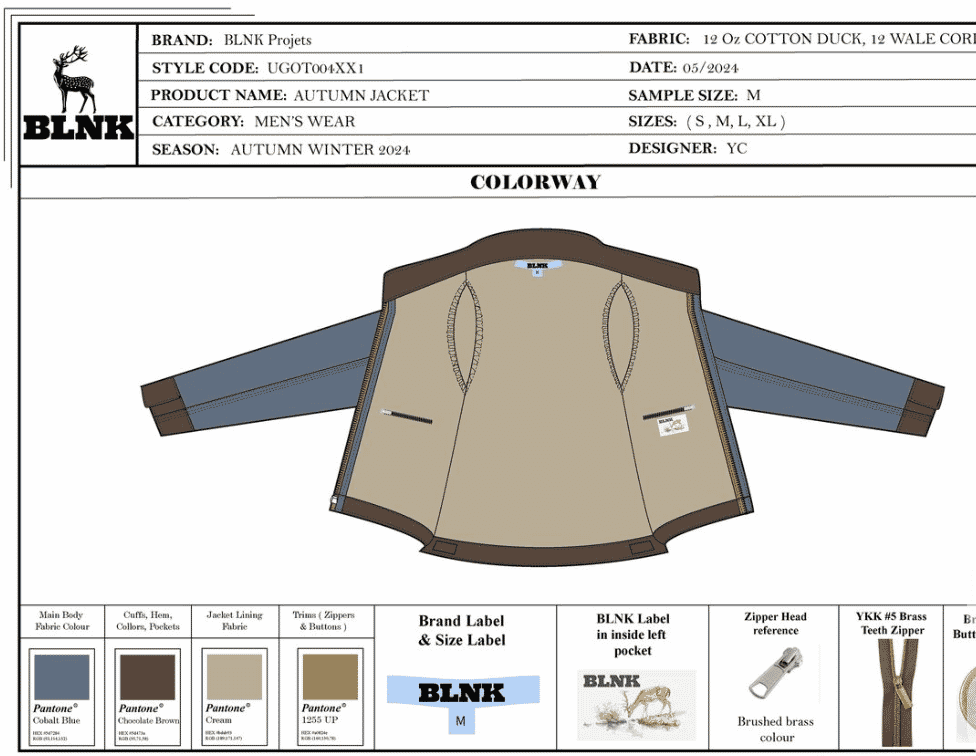
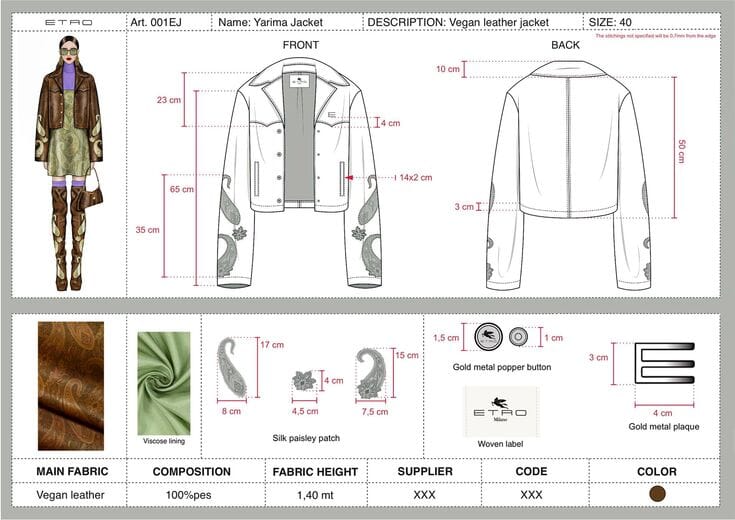
A sweater tech pack is the complete technical document a knit factory uses to make your jumper correctly. It covers the same ground as any tech pack: sketches, materials, measurements, construction, and colors. Techpacker frames a tech pack as roughly eight standard sections (Techpacker). For knitwear, those sections carry extra knit-specific data.
A tech pack is the blueprint a manufacturer follows to turn a design into a product, and it commonly breaks into eight sections covering design, materials, measurements, and construction (Techpacker). For sweaters, gauge and yarn data live inside those same sections rather than replacing them.
If you're new to the format, the what is a tech pack guide explains the structure line by line. A sweater tech pack isn't a separate document type. It's the standard document with knit engineering added where a woven spec would stay silent.
Why is knitwear a different tech pack from cut-and-sew?
Because the factory makes the fabric, not just the garment. A cut-and-sew hoodie starts from finished cloth that's already been knitted or woven to a fixed weight. A fully-fashioned sweater starts from yarn, and the machine builds each panel loop by loop. So the tech pack has to define the cloth, the stitch, and the shape together.
Cut-and-sew garments are cut from pre-made fabric, so the tech pack specifies fabric weight, cutting, and seams. Knitwear panels are knitted to shape from yarn, so the tech pack must specify gauge, yarn count, and stitch structure, data a woven or jersey spec never carries (Sewport).
Here's the part most template packs miss. A cut-and-sew template has a "fabric" field and stops there. Knitwear has no single fabric field, because the fabric is an outcome of gauge, yarn, and stitch working together. Compare it to a woven build like the hoodie tech pack and the gap is obvious. One specs cloth. The other specs how to make cloth.
What must a sweater tech pack contain?
A sweater tech pack contains the same eight-section skeleton as any tech pack, with knit data added inside each one. The framework holds. What changes is the depth. Materials becomes a yarn spec. Construction becomes knit structure and linking. Measurements become relaxed points of measure with knit-scale tolerances.
A knitwear tech pack organizes into the standard eight-section skeleton with a fit-history page added: cover and sketches, BOM, measurements, construction, colorways, labels, grading, and fit history. The difference is the fill. The bill of materials, which must name every material a garment uses (Sewport), here carries yarn, gauge, and stitch data instead of fabric yardage.
Here are the eight sections a knitwear pack needs, and what each holds for a sweater:
- Cover sheet / sketches - flats, style number, season, key views.
- Bill of materials (BOM) - yarn, trims, labels, buttons (Sewport).
- Measurements / points of measure - relaxed POMs plus tolerances.
- Construction / stitching - knit structure, linking, seaming.
- Colorways - yarn shade codes, intarsia or jacquard placement.
- Labels and packaging - care, composition, fold and polybag.
- Grading - how each POM steps across the size run.
- Fit history / comments - sample rounds and corrections.
You can start from a blank tech pack template and add the knit fields below. Don't delete the standard sections. Extend them.
How does gauge drive everything in knitwear?
Gauge is the number of stitches and rows in a fixed area, usually per 10cm, and it sets the scale of the whole garment. If gauge shifts, stitch count stays the same but the panel grows or shrinks. That's why gauge belongs at the top of a sweater tech pack, above the measurement table, not buried in a notes field.
In knitwear, dimensions come from stitch and row counts at a stated gauge, so a small gauge change resizes the whole panel even when the pattern instructions don't change. A woven tech pack has no equivalent variable, which is why gauge is the first thing a knit factory checks against your spec.
I've watched a sweater sample come back a full size out because the factory knit at a slightly looser gauge than the sheet stated. The stitch counts were correct. The tape measure disagreed. Nobody had written the target gauge as a hard number, so there was nothing to reject against. Now I treat gauge as the first line of the spec, and I ask the factory to send a knitted swatch before they cut a single panel.
What gauge should you choose for a sweater?
Choose gauge by the weight and hand you want, because gauge (gg) is the needle count per inch on the knitting bed, and it sets how fine or chunky the fabric reads. A tech pack that skips gauge leaves the factory guessing, and a wrong guess resizes the garment. Tech packs run $500 to $2,000 per style (Guru, 2022), so pinning gauge down protects the whole spend.
Gauge is written as a number followed by "gg". A 3gg machine has three needles per inch, so it knits thick, spongy fabric from heavy yarn. A 14gg machine has fourteen needles per inch and knits a fine, light cloth that feels close to a jersey tee. Higher number, finer knit. Put the target gg on the sheet as a hard figure, then match the yarn to it.
Here's what each common gauge signals, and where it tends to fit:
| Gauge | Needles / inch | Hand | Typical use |
|---|---|---|---|
| 3gg | 3 | Very chunky, heavy, spongy | Oversized winter knits, thick cables |
| 5gg | 5 | Chunky, casual | Everyday chunky jumpers, cardigans |
| 7gg | 7 | Mid-weight workhorse | Standard crew and roll-neck jumpers |
| 12gg | 12 | Fine, lighter | Fine-gauge merino, lightweight knits |
| 14gg | 14 | Very fine, near-jersey | Luxury fine-gauge merino and cashmere |
Gauge values are standard machine gauges; the use column is illustrative, not a data source.
The trap is treating gauge and yarn as separate choices. They aren't. A 3gg machine needs a heavy yarn to fill the loops, and a 14gg machine needs a fine one. Write a fine count against a chunky gauge and the fabric knits thin, holey, and weak. State gauge and yarn count together, and sanity-check that they agree before the sheet leaves your desk.
How do you spec yarn and knit structure?
You spec yarn by fiber, ply, yarn count, and twist, then you spec the stitch structure separately. The bill of materials names the yarn the way the mill sells it. Sewport lists materials and trims as core BOM content (Sewport). For knitwear that material line has to be precise enough for a factory to source the exact yarn.
The bill of materials records every component of a garment, including the main material and trims. For a sweater, the main material is yarn, so the BOM must state fiber, ply, and yarn count (often Nm), because two yarns of the same fiber can knit at very different weights.
Yarn spec
Write the fiber (for example merino wool, cotton, cashmere), the ply, the yarn count in Nm, and the twist. Two "wool" yarns can behave nothing alike. A 2/28Nm merino and a chunky single knit completely different fabrics at completely different gauges. Name the yarn the way the spinner names it, so the factory can source it without guessing.
Reading yarn count (Nm)
Yarn count in Nm tells you how fine the yarn is. Nm, the metric number, is the number of 1,000-metre lengths in one kilogram. So a 1Nm yarn runs 1,000 metres to the kilo and knits thick, while a 28Nm yarn runs 28,000 metres to the kilo and knits fine. Higher Nm, finer yarn. That single number decides which gauge the yarn suits.
Plied yarns show two figures, and the notation matters. A 2/28Nm yarn is two ends of 28Nm twisted together, so the resultant count is 28 divided by 2, which works out at 14Nm. Write both the singles count and the number of ends, because the factory sets machine tension from the resultant count. Get the notation backwards and the yarn arrives at the wrong weight, and the swatch fails.
Ply, twist, and hand
Ply and twist decide how a yarn feels and how it wears. More ends give a rounder, stronger yarn that resists pilling. Tighter twist adds durability but a firmer hand; looser twist feels softer but pills faster. State fiber, quality where it matters (for example 19.5 micron merino), the number of ends, the count, and the twist. Cashmere, merino, lambswool, and acrylic can knit the same gauge yet cost and wear nothing alike.
Yarn is usually the single biggest material cost in a sweater, so the fiber and count you write drive the quote more than any trim. A cashmere spec and an acrylic spec at the same gauge can differ several times over on yarn cost alone. That's why the BOM line has to be exact, not "wool, mid-weight".
Knit structure
State the stitch structure per panel: jersey (plain), rib, links-links, cable, intarsia, or jacquard. Each behaves differently. Rib pulls in, jersey curls at the edges, intarsia carries blocks of color, jacquard floats yarn across the back. If the collar is 2x2 rib and the body is jersey, both go on the sheet with the gauge for each.
Here's how the common structures behave, and what each one needs on the spec:
| Knit structure | How it behaves | What to write on the sheet |
|---|---|---|
| Jersey (plain) | Flat face, curls at the edges, lightest and fastest | "Jersey" plus the body gauge |
| 1x1 rib | Maximum stretch and recovery | "1x1 rib" plus relaxed depth, for cuffs, collars, hems |
| 2x2 rib | Chunkier, elastic, holds shape | "2x2 rib" plus relaxed depth |
| Links-links (purl) | Reversible, textured, heavier | "Links-links" plus the row pattern |
| Cable | Crossed stitches, thick, dimensional | Cable width and cross direction |
| Intarsia | Solid colour blocks, no floats behind | Colour placement map, one yarn per block |
| Jacquard (fair isle) | Colours carried as floats behind the fabric | Float length limit and backing type |
Two of these trip people up. Intarsia carries no yarn across the back, so each colour block is its own yarn and the sheet needs a placement map. Jacquard floats the unused colour across the back, so you write a maximum float length, because long floats snag on fingers and rings. Name the structure per panel, never once for the whole garment.
How do you spec necklines, cuffs, and hems?
Spec them by rib type and relaxed depth, and treat each as an inspection point, because ribs are where knit samples drift most. QIMA lists AQL 2.5 as the most common general inspection level (QIMA), and a mismatched or wrong-depth rib is a classic knitwear fail against it. Write the rib type, the relaxed depth, and the finished style.
Necklines
Neckline height changes the whole look, so state it plainly. A crew neck uses a short rib band, usually 2 to 3cm, linked to the body. A mock neck is a taller stand, roughly 5 to 7cm, not folded. A turtle or roll neck is a tall rib, often 10 to 20cm, folded double. Give the style, the rib type (usually 1x1), the relaxed depth, and whether it folds.
Cuffs and hems
Cuffs and hems are what grip the body, so they run tighter than the panel above them. Cuffs are usually 1x1 or 2x2 rib, 5 to 8cm relaxed, knitted firmer so they hug the wrist. Hems repeat the body rib or use a tubular roll edge. Give the relaxed depth and rib type for each, plus a tolerance, because rib recovers differently than the body and a slack cuff reads as a defect.
Blocking sets the numbers
Blocking is how the final dimensions get locked in. The factory steams or presses each panel or the finished garment to relax the yarn and set the measurements. State clearly that your points of measure are the blocked, relaxed figures. Otherwise someone measures an unblocked panel, sees it short, and re-cuts against a number that was never the target.
How are sweater measurements taken?
Sweater measurements are taken relaxed, with the garment lying flat and unstretched, because knit fabric moves. Stretch a rib cuff and you can add several centimeters that vanish the moment you let go. ASTM publishes standard measurement definitions for sweaters, D5585-21, covering misses' sizes 00 to 20 through subcommittee D13.55 (ASTM).
ASTM D5585-21 provides standard body measurement tables for adult female misses figure types, sizes 00 to 20, maintained by ASTM subcommittee D13.55 (ASTM). Knit points of measure are recorded relaxed, so the tolerances on a sweater spec run wider than a woven equivalent.
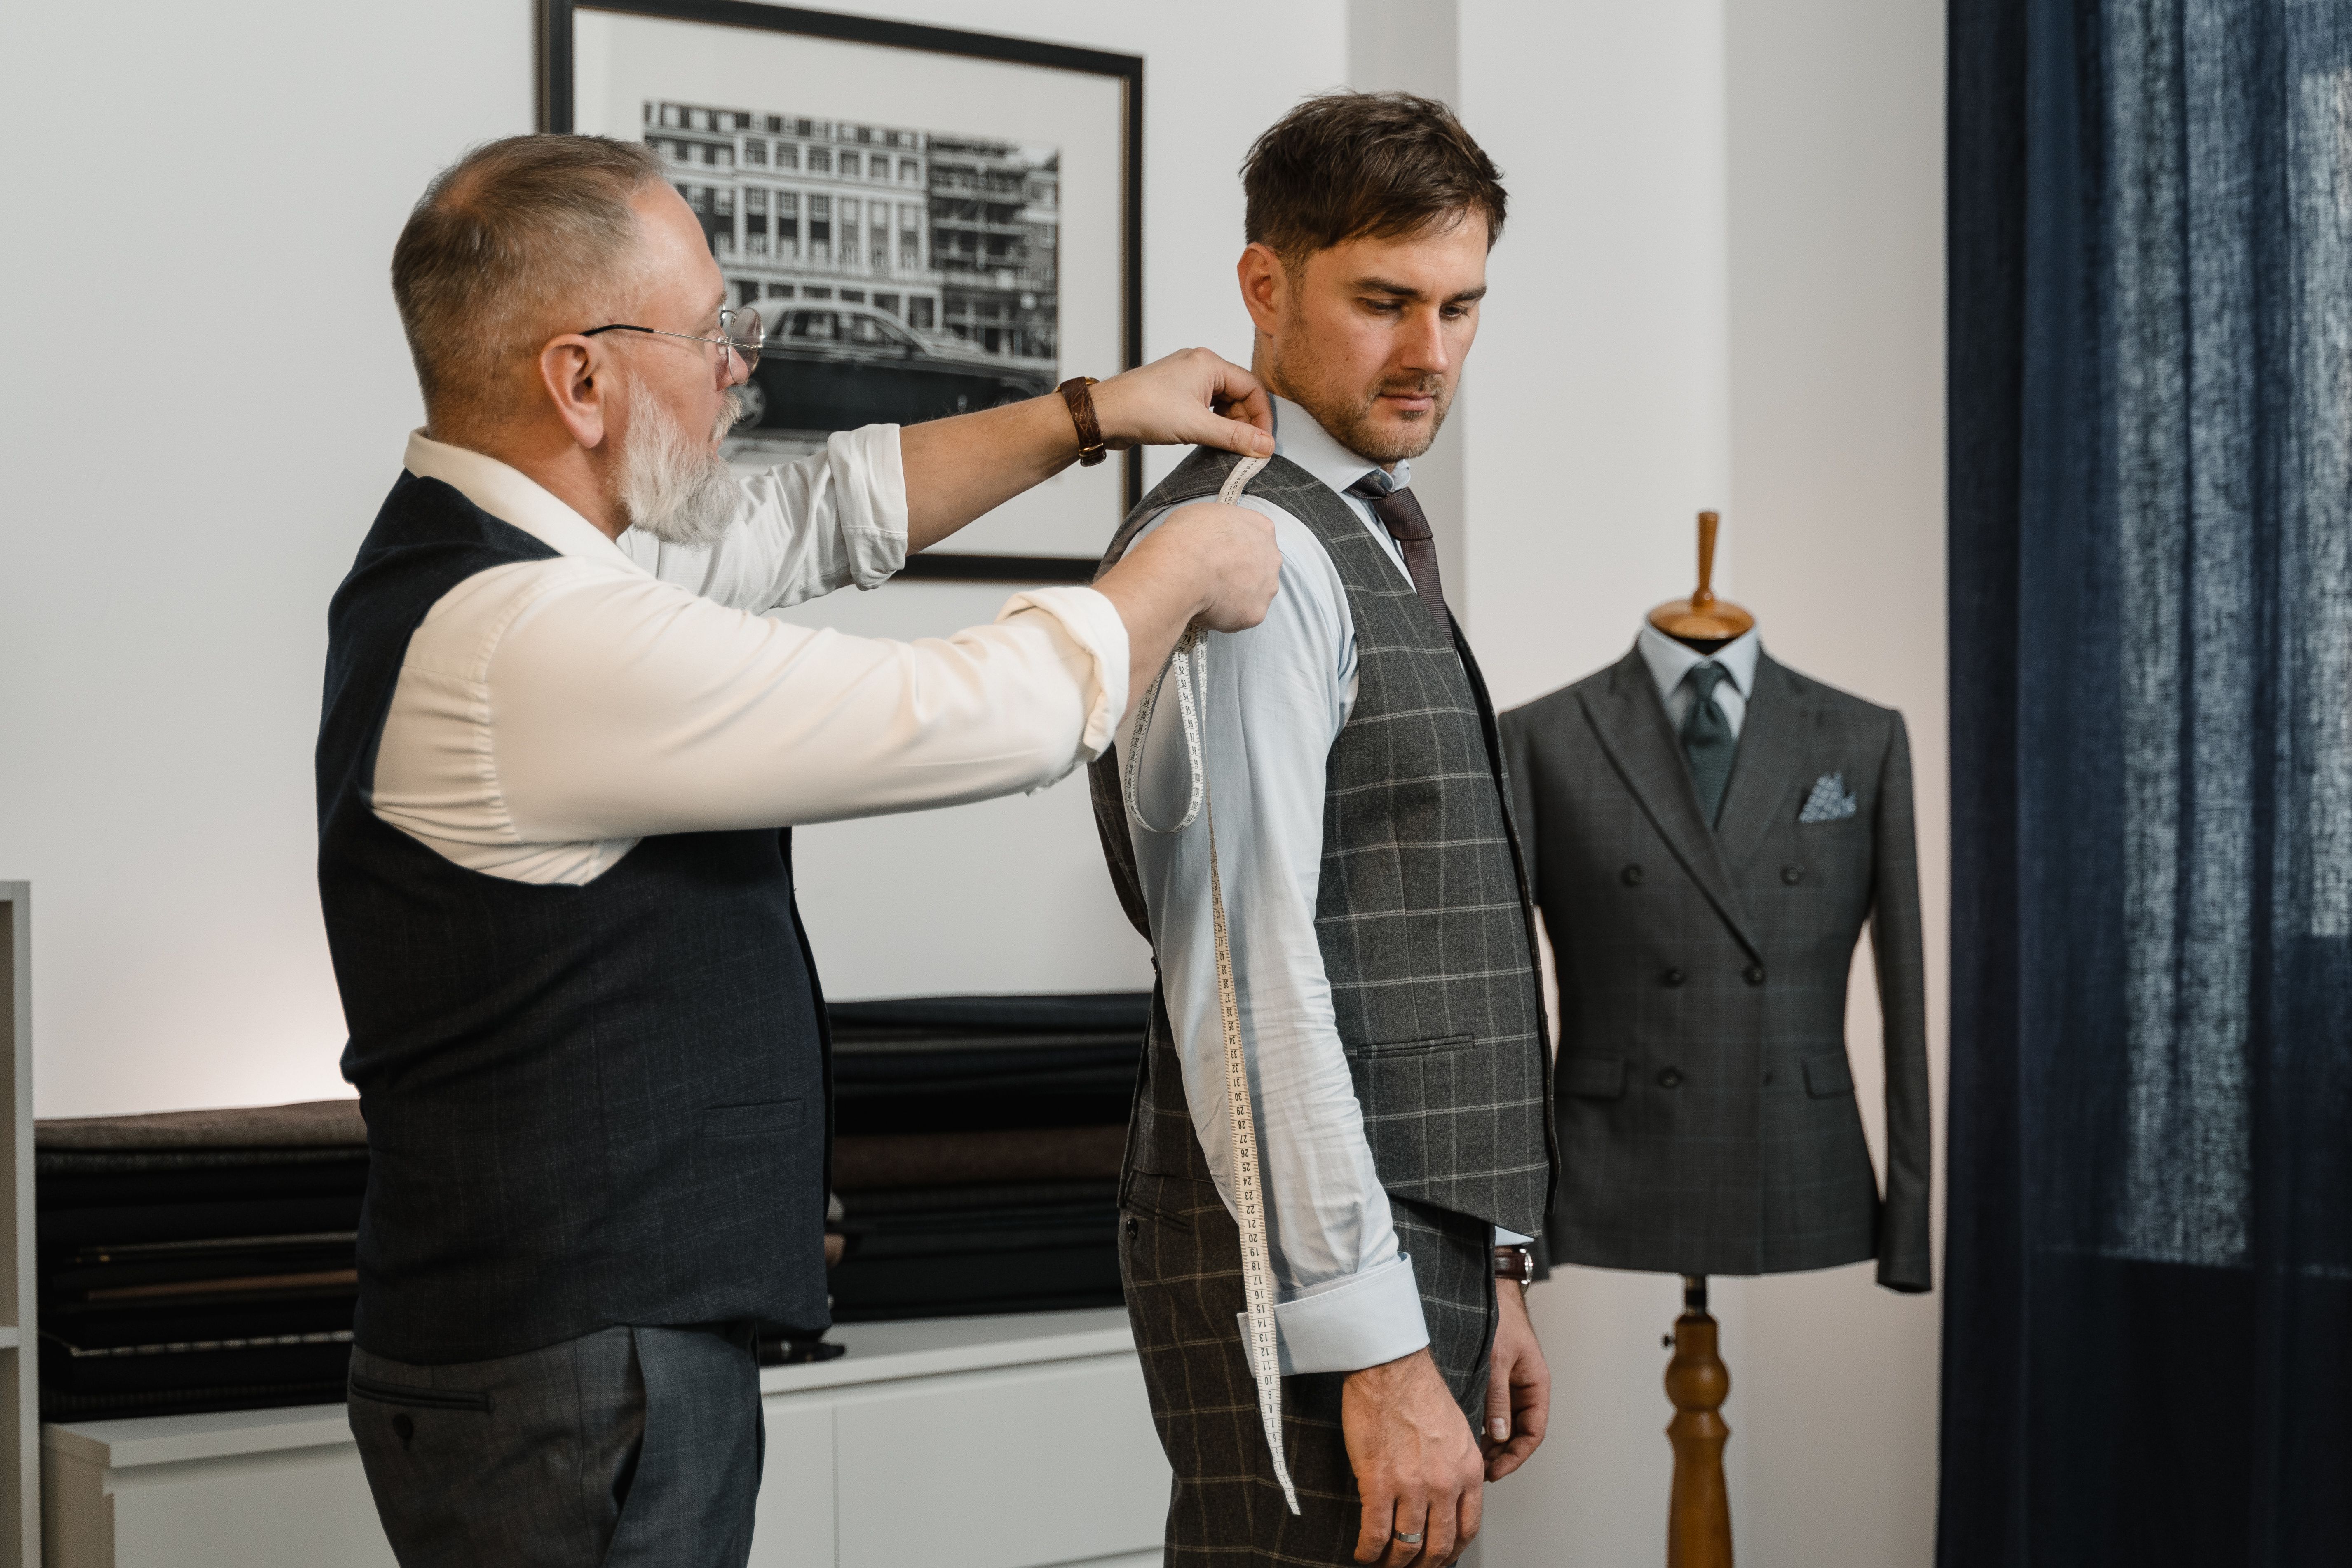
Below is an illustrative points-of-measure table for a size M sweater. The numbers are examples, not a fact source. Use your own graded spec. Notice the wider tolerances on the ribbed areas, because rib relaxes and recovers differently than the body.
| Point of measure (relaxed) | Base size M | Tolerance |
|---|---|---|
| Chest, 2.5cm below armhole | 52.0 cm | ± 2.0 cm |
| Body length, HPS to hem | 66.0 cm | ± 1.5 cm |
| Sleeve length, CB to cuff | 82.0 cm | ± 1.5 cm |
| Cuff width, relaxed | 8.0 cm | ± 0.5 cm |
| Collar rib depth | 3.0 cm | ± 0.3 cm |
| Hem rib depth | 5.0 cm | ± 0.5 cm |
Illustrative only. Replace with your own graded measurements.
Add the rib details next to the table: collar, cuff, and hem depth, plus rib type (1x1 or 2x2). And write the seaming method, linking for a clean, fully-fashioned finish, or overlock for cut-and-sew knit. Missing rib and seaming detail is one of the most common ways a knit sample drifts from intent. The common tech pack mistakes guide covers the rest.
Grading, relaxed and stretched
Grade a knit spec by stitch and row counts, not centimetres alone, because the factory builds each size from a count. State the grade increment per point of measure, for example 5cm at the chest between sizes, and let the factory translate that into added stitches. Measure relaxed for your pass criteria, and note recovery on the elastic areas. A cuff can stretch several centimetres and must spring back, so record the relaxed figure and check the garment returns to it after you let go.
Don't want to build the knit spec yourself? Our tech pack service turns your sketches into a factory-ready sweater tech pack, gauge, yarn, relaxed POMs, and grading, from $299 per style.
How do you spec sweater weight, care, and pilling?
State a target garment weight in grams, a care method, and an anti-pill expectation, because these are the specs a knit buyer checks right after fit. ASTM maintains the sweater body and measurement standards through subcommittee D13.55 (ASTM), but weight, care, and pilling are yours to define on the sheet. Skip them and the factory decides for you.
Garment weight in grams
Weight in grams is both a cost and a quality-control number. Yarn is sold by weight, so a heavier garment burns more yarn and signals a different hand. State a target weight for the base size with a tolerance, for example 420g plus or minus 20g. If bulk arrives light, the factory has usually dropped gauge or swapped to a thinner yarn, and the weight catches it before the customer does.
Pilling and anti-pill
Pilling is loose fibre balling up on the surface, and it's a top complaint on knitwear. Longer-staple fibres, tighter twist, and plied yarns all pill less. If you need an anti-pill finish, write it on the BOM, and add pilling to your defect list so the inspector actually grades it. A soft, loosely-twisted yarn feels lovely in the showroom and pills within a season on the body.
Care, shrinkage, and washing
Wool and cashmere usually need a hand wash or wool cycle and flat drying, because agitation felts and shrinks them. State the care method and the exact care symbols for the label. Knits also relax and can shrink after the first wash, so give an after-wash dimension or a maximum shrinkage percentage, and confirm your points of measure are the post-blocking figures. A sweater that fits at sample and shrinks at home is a return waiting to happen.
Fully-fashioned vs cut-and-sew knit: which do you spec?
Both, depending on the garment, and the tech pack has to say which. Fully-fashioned knitwear is knitted to shape, so each panel is widened or narrowed by adding and dropping stitches, then linked at the seams. Cut-and-sew knit uses a length of knitted fabric that's cut and overlocked like a jersey tee. The methods look similar on the body and behave differently in production.
Fully-fashioned panels are shaped on the machine by adjusting stitch counts, producing a clean fashioned edge and a linked seam, while cut-and-sew knit is cut from knitted yardage and overlocked. The tech pack must state which method applies, because it changes the seaming, the waste, and the factory that can make it.
Fully-fashioned wastes little yarn and gives a premium finish. It also needs specialist machines and more setup, so it fits higher-value styles. Cut-and-sew knit is faster and cheaper for simpler shapes. Write the method on the sheet. A factory quoting one when you meant the other will price and build the wrong garment.
Panels and fashion marks
A fully-fashioned sweater is built from shaped panels, usually a front, a back, two sleeves, and a collar, sometimes with separate pockets or a placket. Shaping happens by moving stitches inward, which leaves small fashion marks a few stitches in from the edge. Those marks are a quality signal on good knitwear, not a fault, so note on the sheet whether they should be visible and where.
Linking versus overlock
Linking joins panels loop to loop on a linking machine, matched to the knit gauge, which gives a flat, low-bulk seam. Overlock stitches cut edges together like a jersey seam, faster but bulkier and less premium. Write the seam method per join, because the same garment might link the collar and overlock a side seam, and the factory needs to know which is which.
What should you hand a knitwear factory?
Hand over the tech pack plus three physical references: a yarn header card, a stitch swatch, and a blocked gauge swatch. A written spec alone leaves too much to interpretation, and tech packs already cost $500 to $2,000 per style (Guru, 2022). The physical references cost almost nothing and stop the expensive misreads.
Yarn header card
A yarn header card is a small card wound with the actual yarn, labelled with fiber, count, shade, and lot. It lets the factory match the exact yarn instead of sourcing a close-enough lookalike. Colour and hand both live in the physical yarn, not in a hex code on a screen, so the card settles arguments a spec sheet can't.
Stitch and gauge swatches
Ask for a knitted swatch of each structure and a 10x10cm gauge swatch, blocked, before the factory knits any panels. Measure the swatch against your target gauge. If it's off, you fix it for the price of a swatch instead of a full sample.
I ask for the gauge swatch on every knit style now, no exceptions. The one time I let a factory skip it to save a few days, the proto came back long in the body and loose at the cuff, and we lost more than a week fixing what a blocked swatch would have flagged on day one. A swatch is the cheapest insurance in knitwear.
Approval sequence
Approve in order: yarn, then swatch and gauge, then a proto, then a pre-production sample. Each gate catches a different error. Sign off the yarn and you've locked colour and hand. Sign off the swatch and you've locked gauge. Skip the swatch gate and the gauge problem surfaces on the proto instead, a sample and a week later than it needed to.
How do you inspect and approve a knit sample?
You inspect against a sampling standard, and the common one is AQL, the Acceptable Quality Limit. Inspectors check a random sample and set a pass or fail ceiling by defect type. QIMA notes AQL 2.5 as the most common general level, 1.0 for higher-risk goods, 4.0 for minor cosmetic defects, and zero tolerance for critical defects (QIMA).
AQL sampling, defined in ISO 2859-1 and ANSI/ASQ Z1.4, lets an inspector accept or reject a batch from a random sample. QIMA reports AQL 2.5 as the most common level, 1.0 for higher-risk products, 4.0 for minor cosmetic issues, and critical defects held at zero (QIMA).
For knitwear, set the AQL, then define the defects that matter: dropped stitches, holes, uneven gauge, broken links, mismatched rib, and off-shade panels. Attach the relaxed POM table as your measurement pass criteria. If the sheet has no target gauge and no tolerances, the inspector has nothing to reject against, and that's exactly how a bad sweater reaches your customer.
Frequently asked questions
What is gauge in a sweater tech pack?
Gauge is the count of stitches and rows in a fixed area, usually per 10cm. It sets the scale of the garment. Change the gauge and every panel resizes, even with identical stitch counts. That's why gauge sits at the top of a knit spec, above the measurement table.
Do I need a different tech pack for knitwear than for cut-and-sew?
You need the same skeleton with knit data added inside it (Techpacker). A woven or jersey template has no gauge, yarn count, or stitch structure fields. For a sweater, those are the fields that make or break the sample, so a plain cut-and-sew template leaves out the most important part.
What is the difference between fully-fashioned and cut-and-sew knit?
Fully-fashioned panels are knitted to shape by adding and dropping stitches, then linked at the seams. Cut-and-sew knit is cut from knitted yardage and overlocked, like a jersey tee. Fully-fashioned wastes less yarn and finishes cleaner. The tech pack must state which method your style uses.
Why does knitwear need a specialist factory?
Knit factories build the fabric and the shape at once, using knitting machines set to a specific gauge and yarn. That equipment and skill differs from a cut-and-sew line. A cut-and-sew factory receives finished cloth; a knit factory receives yarn. For sourcing help, see Portugal Clothing Factory.
How are sweater measurements recorded?
Relaxed, with the garment flat and unstretched, because knit fabric stretches and recovers. Stretch a cuff and the reading is meaningless. ASTM D5585-21 gives standard misses' measurement tables, sizes 00 to 20 (ASTM). Knit tolerances run wider than woven, especially on ribbed collars, cuffs, and hems.
What gauge counts as chunky versus fine?
A low gauge like 3gg or 5gg knits chunky, heavy fabric; a high gauge like 12gg or 14gg knits fine, lightweight fabric. Gauge is the needle count per inch, so a higher number means finer. Match the yarn count to the gauge, and write the target gg on the spec as a hard number.
How is yarn count written on a tech pack?
As a count and a ply, usually in Nm. Nm is the number of 1,000-metre lengths per kilo, so a 28Nm yarn runs 28,000 metres to the kilo and knits fine. A 2/28Nm yarn is two ends of 28Nm, resultant 14Nm. Write the singles count and the number of ends so the factory sets the right tension.
What should you send a knit factory besides the tech pack?
Three physical references: a yarn header card, a stitch swatch, and a blocked 10x10cm gauge swatch. They cost almost nothing and let the factory match the exact yarn and confirm gauge before knitting panels. That catches gauge and shade errors for the price of a swatch instead of a full sample.
Bringing it together
A sweater tech pack isn't a woven spec with a wool label. It's a document that describes the knit itself: gauge first, then yarn, then structure, then relaxed measurements the factory can actually hit. Get gauge and yarn on the sheet as hard numbers, take every point of measure relaxed, state whether the garment is fully-fashioned or cut-and-sew, and set an AQL with a real defect list. Do that and your knit factory builds what you drew. Skip it and you're approving samples on hope. Start from the tech pack template, extend it with the knit fields above, and read the format guide if you want the layout tightened before you send it.
Peter Midea runs a network of 80 clothing factories in Portugal and has watched more garments get rejected on a production line than he'd like to admit.
We build the factory-ready spec a manufacturer can quote from without a single question: technical flats, bill of materials, graded points of measure with tolerances, colorways and construction notes. $299 per style, 3 to 5 working days, 2 to 3 revision rounds.
Get your tech pack — $299Start with the free templateWe don't take your production. The spec is yours to send to any factory, anywhere. Talk to us first if you're not sure what you need.
Sources
Every statistic and definition in this article traces to one of the following. Each is listed once here, and cited inline where it is used.
- Guru
- Techpacker
- Sewport
- QIMA
- ASTM International
- otextilpt.sirv.com
- ASTM International
- images.pexels.com
- Portugal Clothing Factory
Related guides
- Tech packs: the complete guide
- Hoodie tech pack
- T-shirt tech pack
- Free tech pack template