Contents
- What does a real tech pack look like?
- Page by page: walking through the hoodie exa…
- What separates a good tech pack example from…
- What would a factory annotate in red?
- How does a tech pack example differ by produ…
- What makes a tech pack example factory-ready?
- Where can you get a tech pack example to copy?
- Frequently asked questions about tech pack e…
- The bottom line

A standard tech pack costs between $500 and $2,000 to prepare, and takes five to twenty hours of work (Guru, 2022). That's a lot of money for a document most first-time founders have never actually seen. So they guess. They send a factory a photo and a paragraph, then wonder why the sample comes back wrong.
This post fixes that. Below is a worked example: an illustrative pullover hoodie tech pack, walked through page by page. It's not a scan of a real client's file. It's a teaching example built the way factories want to receive one. You'll see what each page holds, what a weak version leaves out, and what I'd circle in red before cutting a single meter of fabric.
Key Takeaways
- A tech pack outlines every design and technical specification of a garment.
- A complete example has eight sections: flats, bill of materials, measurements, cost sheet, grading, colorways, construction, and revision history.
- Preparing one runs $500 to $2,000 and five to twenty hours (Guru, 2022).
- Weak examples skip tolerances and points of measure, which is exactly where inspectors accept or reject a batch.
- You can copy a working structure from a free tech pack template.
What does a real tech pack look like?
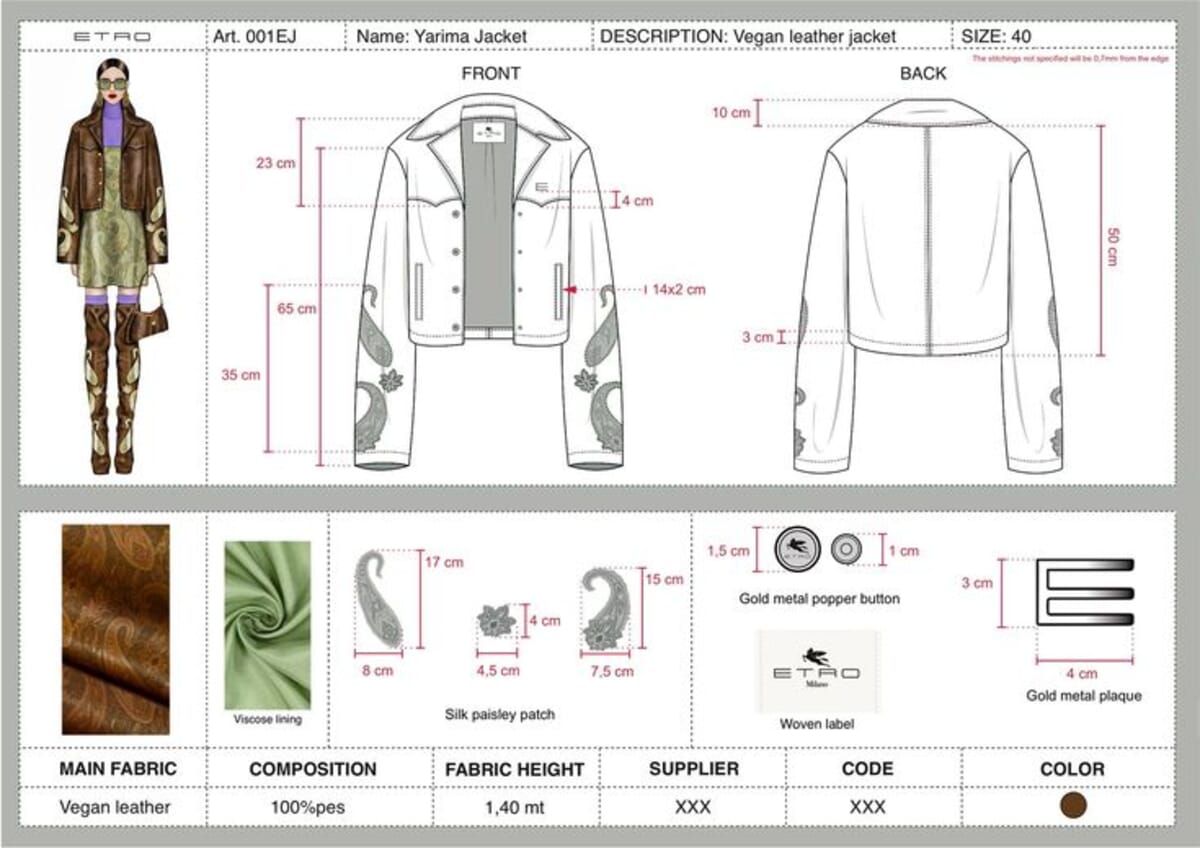
A real tech pack looks like a specification sheet, not a mood board. It's a document containing all the technical information about your product (Sewport). Put another way, it's the file that outlines every design and technical specification of a garment. Think engineering drawing, not Pinterest board.
The format matters less than the completeness. Some brands use a single multi-tab spreadsheet. Others export a PDF, one section per page. What every good example shares is coverage: nothing a machinist needs is left to a phone call. If a detail lives only in your head, it isn't in the tech pack, and my cutters can't build from your head.
When a founder asks whether their file is "good enough," I ask one thing back. Can a machinist who has never spoken to you sew the whole garment from this page alone? If the answer is no, it isn't done yet. That single test catches most gaps.
Citation capsule: A tech pack is the document that outlines every design and technical specification of a garment, covering flat sketches, a bill of materials, measurement specs, and construction notes. Factories build from this file, so anything missing becomes a guess on the production floor.
If you're still fuzzy on the concept itself, start with our plain-English explainer on what a tech pack is before you study the example below.
Page by page: walking through the hoodie example
A complete hoodie tech pack contains eight standard sections: flat sketches, bill of materials, garment measurement specs, a cost sheet, size gradings, colorways, construction notes, and revision history. Each page answers a different question a factory asks. Miss one, and someone on my floor invents the answer for you.
Overview and cover sheet
The overview page carries the identity of the garment. Style name and number, season, designer, base size, target fabric, and a small thumbnail of the front and back. It's the page my production manager reads first. Get the style number and base size wrong here, and every downstream page inherits the error.
A filled-in overview lets me read the whole garment identity in ten seconds: "AW26 pullover hoodie, style GS-1042, base size M, 320 gsm cotton fleece, sample stage 2, updated 12 March." That one line routes the file to the right pattern block and the right fabric store. A weak overview shows a name and a hero photo, then leaves my manager guessing the season, the fit block, and which sample round we're even on.
Flat sketches
Flat sketches are technical line drawings, front and back, drawn to proportion. Not a fashion illustration. Every seam, topstitch line, drawstring, eyelet, and pocket shows here, with callout arrows pointing to construction details. For a hoodie, I want the hood seam, the kangaroo pouch shape, the cuff and hem ribbing, and the drawcord exit points all visible. If you would rather have it built for you, see our hoodie tech pack service.
A complete flats page labels each callout with a letter or number that ties straight back to the construction notes. The front view shows the pouch opening angle and where the drawcord exits; the back view shows the yoke seam and how the hood attaches. A weak flats page gives one three-quarter render and no back view, so the entire hood construction stays invisible. I can't build a hood I can't see, and I won't guess it.
Bill of materials (BOM)
The BOM lists every physical component: shell fabric, rib trim, thread, drawcord, tippets, eyelets, care label, main label, and hangtag. Each line names the material, supplier or reference, color, placement, and quantity. This is the page that decides what my purchasing team orders. A vague BOM means the wrong thread or the wrong weight of fleece.
Here's an illustrative BOM excerpt for the same hoodie. Read the structure and the level of detail, not the exact references. The numbers and codes are a teaching example.
| Component | Material / spec | Color (Pantone TCX) | Placement | Consumption |
|---|---|---|---|---|
| Shell fabric | 320 gsm cotton fleece, 80/20 cotton/poly | Heather Grey 17-0000 | Body, hood, sleeves | 1.7 m / unit |
| Rib trim | 2x2 rib, 380 gsm, matched fiber | Heather Grey 17-0000 | Cuffs, bottom hem | 0.2 m / unit |
| Drawcord | 8 mm flat cotton cord | White 11-0601 | Hood channel | 1.4 m / unit |
| Cord tips | Metal barrel, 18 mm | Matte silver | Both cord ends | 2 pcs / unit |
| Eyelets | Brass, 5 mm inner diameter | Matte silver | Hood front, centered | 2 pcs / unit |
| Thread | Tex 40 spun polyester | Match to shell | All seams | Per operation |
| Main label | Woven damask, folded | Black on white | Center back neck | 1 pc / unit |
| Care / content label | Printed satin, 4 languages | Black on white | Left side seam | 1 pc / unit |
| Hangtag | 400 gsm recycled board | 1-color print | String through neck label | 1 pc / unit |
A complete BOM names the fabric weight in gsm, the fiber split, and a supplier reference. A weak one writes "grey fleece" and stops. That single missing gsm figure is the gap between a 280 gsm summer hoodie and a 400 gsm winter one: same word, wildly different garment. Trims cause the same trouble. "Metal eyelet" could arrive in three diameters. Name the size. Before you send it, run it through our tech pack checker.

Points of measure
Points of measure (POM) are the numbers that make a sample the right size. Each POM names a place to measure, gives the value at the base size, and states a tolerance: how much variation my cutting and sewing may legally have. Here's an illustrative POM table for a men's medium pullover hoodie. Treat the numbers as a teaching example, not a spec to copy blindly.
| Point of measure | Base size (M) | Tolerance |
|---|---|---|
| Body length (HPS to hem) | 27 in | ± 1/2 in |
| Chest width (1 in below armhole) | 22 in | ± 1/2 in |
| Bottom rib width (relaxed) | 20 in | ± 1/2 in |
| Shoulder to shoulder | 20 in | ± 1/4 in |
| Sleeve length (from center back) | 34 in | ± 1/2 in |
| Sleeve opening (cuff relaxed) | 3.5 in | ± 1/4 in |
| Armhole (straight) | 10.5 in | ± 1/4 in |
| Neck width (seam to seam) | 6.5 in | ± 1/4 in |
| Hood height | 15 in | ± 1/2 in |
| Hood width (at opening) | 10.5 in | ± 1/4 in |
| Pouch pocket width | 13 in | ± 1/4 in |
| Rib cuff height | 2.75 in | ± 1/8 in |
A complete POM page carries three things on every row: a clearly named place to measure, a value in stated units, and a tolerance. A weak one shows measurements with no tolerance column, or worse, a picture with a few floating numbers and no point-of-measure diagram to anchor them. Notice how the tolerances shrink as the part gets smaller. Body length tolerates half an inch; a rib cuff tolerates an eighth. That's deliberate, not random.
Cost sheet
The cost sheet totals what one finished unit costs to make. It lists each BOM line with a unit price and a consumption figure, adds labor broken out by operation, then folds in trims, packaging, freight, and a margin. This page is why costing a tech pack takes real specialist hours. A complete cost sheet shows consumption per component, so my purchasing team can re-price the same style at 200 units or 2,000. A weak one drops a single lump "FOB estimate" with no breakdown, and nobody can negotiate or verify a number they can't see inside.
Grading
Grading is the rulebook for sizing up and down from the base. A grade rule sets how much each POM grows per size, so an S, L, and XL all follow the same logic. Standardized body measurement data anchors these decisions. ASTM D5585-21 covers adult female misses figures in sizes 00 to 20 (ASTM), and ASTM D6960/D6960M covers plus women's 14W to 40W (ASTM).
A complete grading page shows the full size run in one table, every POM with its per-size increment. A weak one grades chest and length only, then leaves the sleeve, hood, and pouch ungraded. The result is an XL that fits like a stretched medium, wide in the body but short in the arms. Grade every measurement, not just the obvious two.
Colorways
Colorways show every color combination you plan to produce. For each version, the page maps a color to each BOM component: heather grey shell with white drawcord and silver eyelets, or black shell with black-on-black trim. Reference the color by a system, ideally Pantone TCX, so the dye house and I read the same target.
A complete colorway page pins every component to a code, including thread and drawcord, not just the shell. A weak one writes "black hoodie" and hands the dye house a choice between dozens of blacks. Which black? The one you pictured, or the one that was cheapest to match that week? Name it, and the argument never starts.
Construction notes
Construction notes describe how the garment is assembled: stitch types, seam allowances, stitches per inch, coverstitch versus flatlock, bar-tack positions on the pouch, and how the drawcord is secured. This page is where quality lives or dies. Two factories can read the same flat sketch and build two different hoodies if the construction page stays silent.
A complete construction page reads like an assembly order a machinist can follow top to bottom: coverstitch the hem at 3/4 inch, bar-tack the pouch corners at 42 stitches, attach the hood with a 1/2 inch seam and a single topstitch. A weak one is blank, or names a seam allowance for the hem and nothing else. Blank is exactly where two sewers build two hoodies from the same drawing.
Labels, trims, and revision history
The last pages cover branded and legal components: main label, size label, care and content label with fiber percentages, plus hangtags and packaging. Revision history logs every change, dated, so my team always knows which version is current. Version control sounds boring. It's the difference between cutting v3 and accidentally cutting v1.
A complete revision block shows a version number, a date, and a one-line note on what changed: "v3, 12 March, chest width +0.5 in, drawcord changed to flat cotton." A weak file has no version anywhere, so nobody on my floor can prove which copy is live. When two undated PDFs exist, someone eventually cuts the wrong one. I've watched it happen.
Citation capsule: A complete tech pack spans eight sections, flat sketches, bill of materials, garment measurement specs, cost sheet, size gradings, colorways, construction notes, and revision history. For sizing, standardized body data such as ASTM D5585-21 (misses sizes 00 to 20) anchors the grade rules.
What separates a good tech pack example from a bad one?
The separator is measurable specificity. A strong example carries points of measure with tolerances; a weak one shows a sketch and a fabric name. Standardized measurement work sits under a whole ASTM subcommittee, D13.55, dedicated to body measurement for apparel sizing (ASTM). That level of rigor exists for a reason.
The clearest way to see the gap is page by page. The two examples can look identical at a glance, same sketch, same fabric name, then diverge exactly where a factory has to make decisions. The chart below shows which detail a complete example carries on each page, and which detail a weak one drops.
Here's the mechanism, not a made-up statistic. Garment inspection runs on statistical sampling standards like ISO 2859-1, mirrored by ANSI/ASQ Z1.4. Inspectors pull a sample and accept or reject the batch against an Acceptable Quality Limit. AQL 2.5 is the most common standard for general consumer goods, AQL 1.0 for higher-risk categories, and AQL 4.0 where minor cosmetic defects are acceptable (QIMA).
Now connect the two. If your tech pack has no tolerance column, the inspector has no line to check against. A hood that runs an inch tall might be "wrong" to you and "fine" to the factory, because nobody wrote the acceptable range. Good examples remove that argument in advance. Bad ones start it after the goods ship.
The single highest-value column in the whole document is the tolerance column, and it's the one beginners skip most. Founders obsess over the sketch, which is the part a factory can mostly infer. They ignore tolerances, which is the exact place a batch gets accepted or rejected under AQL rules.
Citation capsule: Garment inspection uses statistical sampling standards like ISO 2859-1 (ANSI/ASQ Z1.4) to accept or reject batches against an Acceptable Quality Limit. AQL 2.5 is standard for general consumer goods, AQL 1.0 for higher-risk items, and AQL 4.0 where minor cosmetic defects are tolerated (QIMA).
For the fuller list of gaps I see weekly, read our companion post on common tech pack mistakes.
What would a factory annotate in red?
If I marked up a weak hoodie example, my red pen would land in predictable places. Missing tolerances top the list, because inspection standards like ANSI/ASQ Z1.4 need a defined range to judge against (QIMA). After that: a silent construction page, an undated file, and a BOM that names "fleece" without a weight.
Here's what draws the pen, in order of how much trouble it causes.
- No tolerance column. The measurements exist, but with no allowed range. My QC has nothing to check against.
- "Fleece, grey" as the BOM. No weight, no composition, no supplier reference. I could send you three different fabrics and all would technically match.
- A blank construction page. No stitch type on the pouch bar-tacks, no seam allowance, no stitches per inch. Two sewers, two hoodies.
- No drawcord or eyelet spec. Cord thickness, length, and eyelet placement missing. These small trims stall a whole run.
- No revision date. I can't tell if I'm holding the current version. This is how the wrong pattern gets cut.
None of these need a designer. They need a founder who treats the tech pack as a contract. Write the range. Name the fabric weight. Date the file. Do those three, and half my red marks vanish.
Citation capsule: A factory's most common markups target missing tolerances, because garment batches are accepted or rejected using sampling standards such as ANSI/ASQ Z1.4 against a defined Acceptable Quality Limit. Without a stated tolerance range, quality control has no objective line to inspect against.
If your pages look nothing like the structure above, it's usually a format problem, not a talent problem. Our guide to what a tech pack includes walks through how to lay each page out cleanly.
When you'd rather hand this off than learn it, that's a fair choice. My studio builds production-ready tech packs for brands through our tech pack service, using the same eight-section structure factories expect. You send the design intent; you get a file a machinist can build from without a single phone call.
How does a tech pack example differ by product type?
The eight sections stay the same, but their weight shifts hard with the product, because a tech pack contains all the technical information about that specific item (Sewport). A knit tee, a woven shirt, and a bag each stress a different page. Copy a hoodie example blindly onto a bag and you'll ship a beautiful, unbuildable file.
A knit tee is the lightest example. It has fewer points of measure, and because the jersey stretches, some tolerances run a touch looser than on a stiff fabric. The construction page is short: overlock the side seams, coverstitch the hem and neck, bind or rib the collar. Grading is simple. Most of the risk sits in fabric weight and neck construction, so those lines earn the detail.
A woven shirt is the opposite. It carries the most points of measure of the three: collar, cuff, placket, yoke, and armhole all need their own numbers, and non-stretch cloth means tighter tolerances everywhere. The BOM grows too, with interlining, buttons, and a named buttonhole spec. Fabric gets described by weave and thread count, not just weight. This is the example where a missing tolerance hurts fastest.
A bag barely uses the body-size logic at all. It isn't graded to a human figure, so the grading page turns into a hardware and dimension schedule. The BOM is dominated by hardware: zippers, rivets, D-rings, webbing, magnetic snaps, each with a named supplier and finish. Construction notes cover box stitching, edge binding, and lining attachment. Tolerances tend to tighten around hardware placement, where a 3 mm shift shows.
| Product | Points of measure | Tolerance feel | BOM driven by | Grading |
|---|---|---|---|---|
| Knit tee | Fewer | Looser (stretch) | Fabric + neck trim | Simple |
| Woven shirt | Most | Tight (no stretch) | Buttons, interlining, cloth | Detailed |
| Bag | Fixed dimensions | Tight on hardware | Hardware + webbing | Not body-graded |
The mistake I see most from founders with a range is treating one example as a master template for everything. They perfect a tee file, then reuse its thin construction page for a structured jacket, and the sample comes back soft where it should hold shape. Each product type deserves its own depth, not a copy-paste.
Citation capsule: A tech pack example keeps the same eight sections across products, but their emphasis shifts: a woven shirt carries the most points of measure and tightest tolerances, a knit tee the fewest, and a bag replaces body grading with a hardware and dimension schedule driven by zippers, rivets, and webbing (Sewport).
What makes a tech pack example factory-ready?
A factory-ready example is one a machinist can build without a single phone call, and the line between a pretty document and a buildable one comes down to a handful of concrete elements. Sizing is anchored to standardized body data such as ASTM D5585-21 for misses figures (ASTM). The rest is discipline, not artistry.
Five things move a file from draft to factory-ready. Miss any one and my floor slows down or starts guessing.
- Units on every number. Inches or centimeters, stated once and held everywhere. A spec that mixes both, or omits the unit, forces a factory to assume, and assumptions cut fabric wrong.
- A tolerance on every point of measure. This is the column inspectors check a batch against. Without it, "wrong" becomes an opinion instead of a measurement.
- Seam and stitch callouts. Stitch type, stitches per inch, seam allowance, and bar-tack positions, named per operation. This is what stops two factories building two different garments.
- Colorway by a named system. Pantone TCX or an equivalent code on every component, so the dye house targets your color, not its nearest guess.
- A dated revision block. A version number and date on every page, so there's never a question about which copy is live.
Here's the pattern I notice: founders judge a file by how polished the sketch looks, but factories judge it by how few decisions it forces us to make. A plain-looking file with tolerances, units, and stitch specs is more factory-ready than a gorgeous render with none of them. Beauty isn't buildability.
Citation capsule: A factory-ready tech pack example states units on every measurement, a tolerance on every point of measure, seam and stitch callouts per operation, a Pantone code on every colorway component, and a dated revision block. Sizing is anchored to standardized body data such as ASTM D5585-21 for misses figures (ASTM).
Where can you get a tech pack example to copy?
You can copy the structure for free before you copy any numbers. A blank, correctly-sectioned document beats a polished PDF you don't understand, because preparing a tech pack from scratch runs $500 to $2,000 and five to twenty hours of specialist time (Guru, 2022). Starting from a proven skeleton saves most of that.
Grab our free tech pack template and fill it against the hoodie walkthrough above. Keep the eight sections, keep the tolerance column, and swap in your own garment. Then pressure-test it with the single question from earlier: could a machinist who has never met you build the whole thing from these pages alone?
For the wider picture of how tech packs fit into product development, our tech packs pillar guide links every stage together. And if you haven't chosen a manufacturer yet, that's a separate job entirely; find and vet one before you send your file anywhere.
Citation capsule: Preparing a standard tech pack costs $500 to $2,000 and takes five to twenty hours of specialist work. Starting from a pre-sectioned template preserves the eight standard sections a factory expects while removing most of that setup cost for a first-time brand.
Frequently asked questions about tech pack examples
What is the best format for a tech pack example, PDF or spreadsheet?
Both work if they're complete. A spreadsheet edits faster during development, while a PDF locks the version you send to production. Many brands develop in a sheet, then export a tech pack PDF example per section for the factory. The format never matters as much as covering all eight sections.
How many pages should a hoodie tech pack example have?
There's no fixed count, but a complete hoodie example usually runs six to twelve pages: overview, flats, BOM, points of measure, grading, colorways, construction, and labels. These are the standard sections. Simple garments need fewer pages, heavily-trimmed ones need more.
Can I use a free tech pack sample instead of paying for one?
Yes, for structure. A free tech pack sample teaches you the sections and the logic, which is most of the value. Paying $500 to $2,000 buys accurate specs and grading for your exact garment (Guru, 2022). Start free with a template, then upgrade the parts that need precision.
Why do factories reject garments that matched the sketch?
Because sketches show shape, not size. Inspection accepts or rejects batches against a numeric Acceptable Quality Limit using standards like ANSI/ASQ Z1.4 (QIMA). If your example has no measurements with tolerances, a garment can match the drawing and still fail on fit. The tolerance column prevents that.
What tolerance should I put in my tech pack example?
Tolerances depend on the point of measure and the garment. Large dimensions like body length often allow around half an inch, small trims like a rib cuff much less. Base your grade rules on standardized body data such as ASTM D5585-21 for misses sizing (ASTM), then confirm ranges with your factory.
What should a bill of materials show in a tech pack example?
A complete BOM lists every physical component with its material spec, weight or size, color, placement, and consumption. For a hoodie that means shell fleece in gsm, rib trim, drawcord, cord tips, eyelets, thread, and labels. A weak BOM names "grey fleece" with no weight, which lets three different fabrics all match.
How is a tech pack example for a bag different from one for a garment?
A garment example is graded to body sizes and leans on points of measure. A bag isn't body-graded, so its grading page becomes a fixed dimension and hardware schedule. The BOM shifts toward zippers, rivets, D-rings, and webbing, each with a named supplier, and tolerances tighten around hardware placement.
What makes a tech pack example factory-ready?
A factory-ready example states units on every number, a tolerance on every point of measure, seam and stitch callouts per operation, a Pantone code on each colorway component, and a dated revision block. Sizing is anchored to standardized body data such as ASTM D5585-21. A machinist can then build it without a phone call.
The bottom line
A tech pack example isn't decoration. It's the document that decides whether your first sample arrives right or wrong. Walk back through the hoodie above and notice how little of it is artistic. Most of it is numbers, ranges, and named components. That's the part beginners skip, and it's the exact part my floor needs.
Do three things and you'll clear most of my red pen. Add a tolerance column to every point of measure. Name your fabric by weight and composition, not just color. Date every revision. Then start from the free tech pack template, build your own version against this walkthrough, and read up on tech pack format so each page lands clean.
We build the factory-ready spec a manufacturer can quote from without a single question: technical flats, bill of materials, graded points of measure with tolerances, colorways and construction notes. $299 per style, 3 to 5 working days, 2 to 3 revision rounds.
Get your tech pack — $299Start with the free templateWe don't take your production. The spec is yours to send to any factory, anywhere. Talk to us first if you're not sure what you need.
Sources
Every statistic and definition in this article traces to one of the following. Each is listed once here, and cited inline where it is used.
- Guru
- Sewport
- Pexels
- ASTM International
- ASTM International
- ASTM International
- QIMA
- otextilpt.sirv.com
Related guides
- Tech packs: the complete guide
- 11 tech pack mistakes
- The tech pack format factories want
- How to make a tech pack, step by step
- One tech pack, many factories: what they all ask
Peter Midea is GarmentSpec's technical lead for brand development.