Contents
- What is a tech pack, and why build it in ord…
- Step 1: Where do you start a tech pack?
- Step 2: How do you draw the technical flat?
- Step 3: What goes in the bill of materials?
- Step 4: How do you write points of measure?
- Step 5: How do you grade the size run?
- Step 6: What tolerances should you set?
- Step 7: How do you specify construction and…
- Step 8: What labels and colorways do you add?
- Step 9: How do you export the final PDF?
- How long does building a tech pack take?
- Frequently asked questions
- Wrapping up

A tech pack is the spec sheet a factory reads to cut, sew, and check your garment. Build it wrong and the wrong thing ships. Independent estimates put a professionally built tech pack at $500-$2,000 per style (Guru, 2022), and most of that cost is the thinking, not the drawing. Making a tech pack and creating one are the same job, whichever word you use. This guide walks you through it in order, one step at a time, using a pullover hoodie as the running example. No jargon dumps. Just the build, the mistake beginners make at each stage, and the fix. By the end you'll have a file a factory can actually quote from.
Key Takeaways
- A tech pack has eight standard sections: flat sketches, bill of materials, measurement specs, cost sheet, size gradings, colorways, construction notes, and revision history.
- Build it in order: reference, flat, BOM, measurements, grading, tolerances, construction, labels, export.
- Beginners quit at grading and tolerances. That's exactly where garments get rejected.
- Export one style per PDF so nothing gets crossed on the floor.
What is a tech pack, and why build it in order?
A tech pack is a document that tells a factory everything needed to make your garment: what it looks like, what it's made of, how big it is, and how it's sewn. Building it in order matters because each section feeds the next. Your flat drives your measurements. Your measurements drive your grading. For the size chart itself, try our size chart generator.
A standard tech pack carries eight sections: flat sketches, a bill of materials, measurement specs, a cost sheet, size gradings, colorways, construction notes, and revision history. Skip one and the factory fills the gap with a guess. Guesses cost you samples. If you want the full reference version, the tech pack pillar guide covers every section in depth, and what a tech pack is explains the basics first.
Those eight sections don't get built in isolation. They come together across a nine-step sequence, with reference-gathering at the front and export at the back. Here's that build order.
Step 1: Where do you start a tech pack?
Start from a physical reference garment or a single clear, dimensioned image. Don't start from a mood board. You need one concrete object your factory can look at, hold, or measure against. For our hoodie, that means an existing pullover you already own and like the fit of.
The reference is your ground truth for every later step. A tech pack is the technical blueprint that carries a garment from concept to production, and a blueprint needs a real starting object. Pick a hoodie that fits the way you want, note what you'd change, and photograph it flat on a hard surface in good light. Front and back.
The beginner mistake here is starting with inspiration instead of a garment. A Pinterest board tells nobody how long the sleeve is. The fix: buy or borrow one real hoodie and treat it as your control sample.
In the factories our clients work with, the styles that quote fastest are the ones that arrive with a real reference garment attached. When a client sends only a rendered image, we send questions back, and the sample slips a week.
Tools for this step stay low-tech. A tape measure, a phone camera propped steady, a hard flat surface, and a plain notes doc for every change you want. No software yet. That's deliberate: the reference exists before any file does.
Budget 30 to 60 minutes. Shooting the garment flat is fast. The part worth slowing down for is deciding what you'd actually change, because those notes shape every measurement that follows.
Here's the hoodie worked through (illustrative values): body 2cm longer, sleeve 1cm shorter, hood a little deeper, pocket opening slightly wider. Four changes, each written against a garment you can hold, not a picture nobody can measure.
Step 2: How do you draw the technical flat?
Draw a flat, black-and-white technical sketch of the front and back, in proportion, showing every seam and detail. This is a working drawing, not fashion art. No body, no shading, no attitude. Just the garment as if it were laid on a table and traced.
Technical flats are the first section of a standard tech pack, and they anchor everything else, because your measurement points get placed directly on them. For the hoodie, draw the hood, the kangaroo pocket, the cuff and hem ribbing, the drawcord, and the eyelets. Most people build these in Adobe Illustrator; our guide to drawing technical flats in Illustrator covers the exact process.

The beginner mistake is drawing the flat too small or out of proportion, so the pocket looks right but sits wrong once graded. The fix: draw at a consistent scale and check the flat against your reference garment before you move on.
Illustrator is standard, but it isn't the only path. Affinity Designer and the free, open-source Inkscape both draw clean vectors. CLO 3D can flatten a 3D sample into a technical view. Pick one tool and stay in it, because switching mid-draw is how scale drifts.
We've also tested AI flat generators. The one we've run styles through is Adstronaut (disclosed: it's an AI vendor, not a neutral tool), and it produces a rough front and back you then correct by hand. It solves the blank-page problem, not the accuracy work. Every line still needs checking against the reference.
Plan on 1 to 3 hours for a first flat, dropping fast once you reuse a base you've drawn before. For the hoodie, put front and back on one artboard at the same scale: hood as two panels, kangaroo pocket centered, 2x1 rib at cuffs and hem, drawcord through two eyelets.
Step 3: What goes in the bill of materials?
The bill of materials, or BOM, is the full list of every physical component in the garment. Fabric, thread, ribbing, drawcord, eyelets, labels, hangtags, and the poly bag it ships in. Each line needs a description, a supplier or reference, a color, and a placement.
A BOM lists all materials and components a factory needs to source and assemble the piece (Sewport), and it's one of the eight core sections every tech pack carries. For the hoodie: 340gsm brushed-back French terry for the body, matching 2x1 rib for cuffs and hem, tex 40 thread, metal eyelets, a flat drawcord with tipped ends, a woven main label, and a printed care label.
The beginner mistake is listing the fabric and forgetting the trims. Thread color, label placement, and drawcord finish all get skipped, then the factory guesses. The fix: walk the reference garment top to bottom and log every single component, including the ones you can't see from the front.
A spreadsheet is enough to build a BOM: Google Sheets or Excel, one row per component. Give every row a description, a supplier or reference, a color, and a placement. Budget 30 to 60 minutes once the garment's in your hands. Here's a trimmed hoodie BOM (illustrative):
| Component | Spec | Placement |
|---|---|---|
| Body fabric | 340gsm brushed-back French terry | Whole body |
| Ribbing | 2x1 rib, matching color | Cuffs and hem |
| Thread | Tex 40, tonal | All seams |
| Drawcord | Flat cord, tipped ends | Hood channel |
| Eyelets | Metal, 4mm inner | Hood, 2 pieces |
| Main label | Woven | Center back neck |
| Care label | Printed satin | Left side seam |
| Poly bag | Recyclable LDPE | Packing |
Step 4: How do you write points of measure?
Points of measure, or POM, are the exact places you measure the garment and the target number for each. Chest width, body length, sleeve length, hood height, cuff opening, and more. You write them for one base size first, usually a medium.
Measurement specs are a standard tech pack section, and they translate your flat into numbers a factory can cut to. Measure your reference hoodie flat, one point at a time, and record each in centimeters or inches. Be consistent. Half-chest measured one inch below the armhole is a different number than half-chest at the widest point, so define exactly where each measurement is taken.
The beginner mistake is vague point names like "length" with no start and end. The fix: define the measurement method for every point, ideally with a small diagram, so your medium and the factory's medium are the same garment.
The tools are a tape measure and a spreadsheet, plus Illustrator to draw the POM diagram with numbered lines matching the spec rows. Measure the reference flat, never on the body, and take each point the same way every time. Give it 1 to 2 hours for a first spec. Here's a partial hoodie POM at base size medium (illustrative values, in cm):
| Point of measure | Method | Medium |
|---|---|---|
| Half chest | 2.5cm below armhole, edge to edge | 56 |
| Body length | High point shoulder to hem | 70 |
| Sleeve length | Center back neck to cuff edge | 85 |
| Hood height | Neck seam to hood top | 38 |
| Cuff opening | Relaxed, edge to edge | 9 |
| Pocket opening | Along the opening edge | 16 |
Step 5: How do you grade the size run?
Grading is scaling your base-size measurements up and down to create the full size run: XS, S, M, L, XL. It's not one flat percentage. Each point of measure gets its own grade rule, because a chest grows differently than a cuff between sizes.
Standardized grade increments exist for a reason. ASTM D5585-21 publishes body measurements for misses sizes 00 to 20 (ASTM), and ASTM D6960/D6960M adds plus sizes 14W to 40W (ASTM), both maintained by ASTM Subcommittee D13.55 (ASTM). Use these as sanity checks for your increments.
Here's where most beginner tech packs quietly fail. People stop at the medium and let the factory grade for them. That hands away control of fit across your whole size run. Grade every point yourself, even roughly, and the size run stays yours.
The beginner mistake is applying one grade rule to every measurement. The fix: set separate increments for chest, length, sleeve, and neck, then check the extremes, XS and XL, against a body-measurement reference so the garment still fits a real person at the ends of the run.
To grade, a spreadsheet with a column per size does the job: enter your base numbers and a per-point increment. Pattern and CAD software like CLO 3D grades a pattern directly. Whichever you use, the increment, not the software, is the real decision. Give grading 1 to 3 hours the first time. Here's the hoodie graded from a medium base (illustrative increments, cm):
| Point of measure | Grade per size | S | M | L | XL |
|---|---|---|---|---|---|
| Half chest | +2.5 | 53.5 | 56 | 58.5 | 61 |
| Body length | +2 | 68 | 70 | 72 | 74 |
| Sleeve length | +1.5 | 83.5 | 85 | 86.5 | 88 |
| Cuff opening | +0.5 | 8.5 | 9 | 9.5 | 10 |
Notice the grades differ per point. The chest moves 2.5cm a size while the cuff moves 0.5cm, because a body widens faster than a wrist. That's the whole reason one flat percentage fails.
Step 6: What tolerances should you set?
A tolerance is the amount a finished measurement can differ from your target and still pass. If your medium chest is 56cm with a tolerance of 1cm, anything from 55cm to 57cm is acceptable. No factory hits exact numbers. Fabric moves, and cutting has variation.
Tolerances connect directly to inspection. Factories check garments against sampling standards like ISO 2859-1, published in the US as ANSI/ASQ Z1.4, using an Acceptable Quality Limit. QIMA notes AQL 2.5 is the most common general standard, AQL 1.0 for higher-risk goods, AQL 4.0 for minor cosmetic issues, and zero tolerance for critical defects (QIMA). A measurement outside tolerance counts as a defect against that limit.
Beginners often send a spec with no tolerances at all, and then they're angry when a batch measures 2cm off. Without a stated tolerance there's no line to fail against. Set your tolerances, and both sides know what "correct" means before cutting starts.
The beginner mistake is skipping tolerances or setting them impossibly tight. The fix: put a realistic tolerance on every point of measure, tighter on chest and length, looser on minor points, so your inspection has a fair, clear pass line.
The tool is the same spreadsheet: add one tolerance column next to your target numbers. That's the entire mechanic. The judgment is choosing values fair to a real factory yet tight enough to protect fit. It takes ten minutes of typing and an hour of thinking about which points actually matter. For the hoodie (illustrative): chest and body length at plus or minus 1cm, sleeve at plus or minus 1cm, cuff and hood at plus or minus 0.5cm. Fit-critical points get a little room; small points stay tight.
Step 7: How do you specify construction and callouts?
Construction notes tell the factory how the garment is assembled: seam types, stitch types, stitches per inch, and finishing. Callouts are the leader lines on your flat pointing to specific details with a short instruction. This is where a garment stops being a shape and becomes a set of instructions.
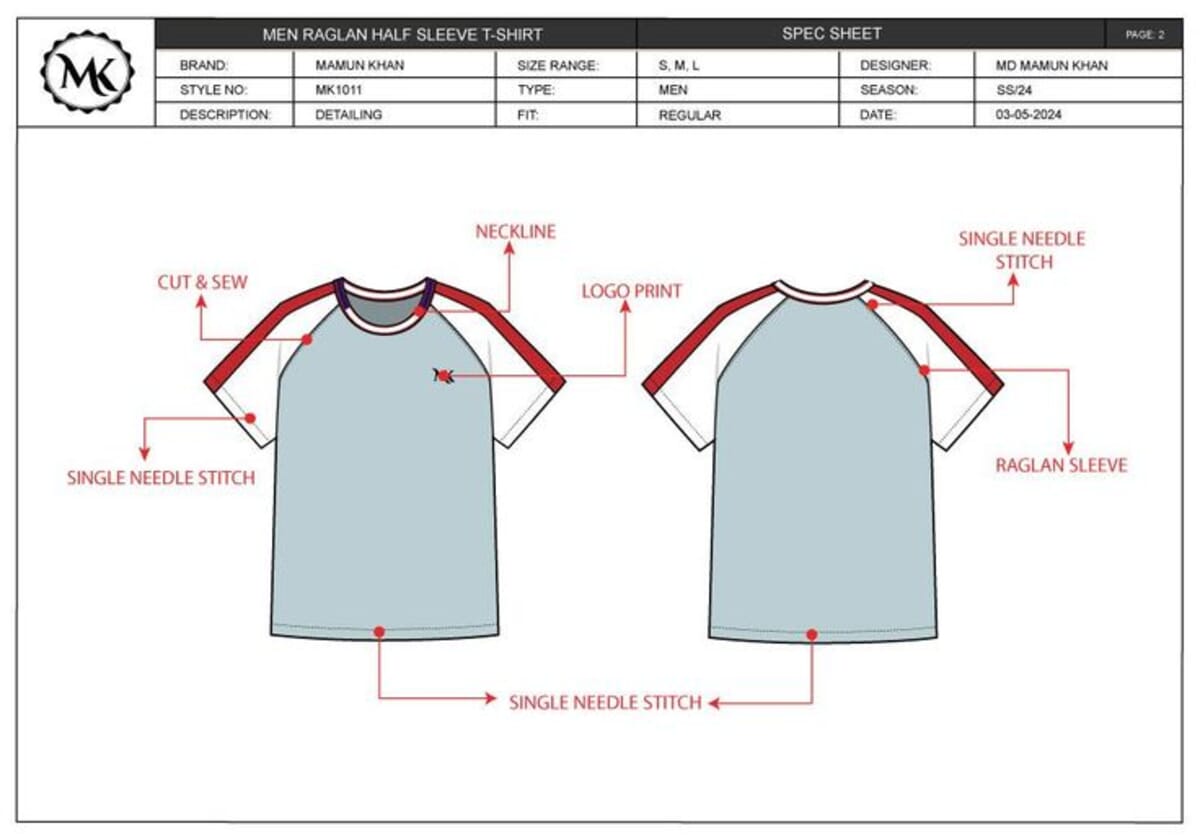
Construction notes are one of the eight standard tech pack sections, and they remove the guesswork that costs samples. For the hoodie, specify: overlock plus coverstitch on the hems, twin-needle topstitch on the pocket, bar tacks at the pocket corners and drawcord exits, and the exact eyelet type and spacing.
The beginner mistake is assuming the factory "knows the standard way." There isn't one universal standard way. The fix: call out every seam and finish that matters to you, and leave a note only where you genuinely don't mind how it's done.
You need two things here: a stitch and seam reference so your codes mean the same thing to the factory, and your flat with leader-line callouts drawn in Illustrator. Name the stitch, the seam, and the stitches per inch. Set aside 1 to 2 hours. For the hoodie (illustrative): 12 stitches per inch on structural seams, overlock plus coverstitch at the hems, twin-needle topstitch on the pocket, and bar tacks at the pocket corners and drawcord exits. Each of those is a callout, not an assumption a factory has to make.
Step 8: What labels and colorways do you add?
Add your colorways, label artwork and placement, and a revision block. Colorways are the exact color versions of the style. Labels cover the woven main label, care and content label, and any size tab. The revision block tracks every change with a date and a version number.
Colorways and revision history are two of the eight standard sections. For the hoodie, define each colorway against the BOM, so "Heather Grey" points to a real fabric reference. Show label artwork at size with placement measured from a seam. Then start your revision log at v1.0.
If building from scratch feels heavy, start from a structured tech pack template so the sections and revision block are already laid out for you.
Not everyone wants to build this alone. Our tech pack service turns your reference garment and sketches into a full factory-ready file for a flat $299, tolerances and grading included.
The beginner mistake is treating labels and colorways as an afterthought. The fix: lock them before export, because a missing care label or an undefined color stalls the whole order at the factory.
Color needs a real reference, not a screen swatch. Name each colorway against a Pantone TCX or TPG code so "Heather Grey" means one exact grey a dye house can match. Draw label artwork at size in Illustrator, then place it with a measurement taken from a seam. Budget 45 to 60 minutes. For the hoodie (illustrative): two colorways, Heather Grey and Black; the woven main label centered 2cm below the back neck seam; the care label on the left side seam, 10cm up from the hem.
Step 9: How do you export the final PDF?
Export one style per PDF, with every section in order and a clear cover page. One file per garment. Don't combine three hoodies into one document, because that's how the wrong colorway ends up on the wrong body on the cutting floor.
A tech pack is the single document a factory works from, carrying all eight sections together. Check that your flats, BOM, measurements, grading, tolerances, construction, and labels all read cleanly at print size. Number your pages. Put the style name and revision on every page footer. Our guide to tech pack format and layout covers exactly how the finished file should look.
The beginner mistake is exporting a low-resolution file where the callout text is unreadable. The fix: export at print quality, open it on a phone, and confirm you can read the smallest measurement without zooming in.
Export from Illustrator or InDesign as a print-quality PDF, or from whichever tool you built the pack in. This step is fast, 20 to 30 minutes, but don't rush the proof. Confirm page order, footers, and that every callout is legible before it leaves your screen. A tech pack the factory can't read is a tech pack the factory will guess at, and you're back to lost samples.
The build in one table
| Step | What beginners get wrong | The fix |
|---|---|---|
| 1. Reference | Starting from a mood board, not a garment | Use one real hoodie as your control sample |
| 2. Flat | Drawing it out of proportion | Draw at consistent scale, check against the reference |
| 3. BOM | Listing fabric, forgetting trims | Log every component, including hidden ones |
| 4. Measurements | Vague point names with no start and end | Define the method for every point of measure |
| 5. Grading | One grade rule for every measurement | Separate increments per point; check XS and XL |
| 6. Tolerances | No tolerances, or impossibly tight ones | Realistic tolerance on every point |
| 7. Construction | Assuming a universal "standard way" | Call out every seam and finish that matters |
| 8. Labels and colorways | Treating them as an afterthought | Lock them, with references, before export |
| 9. Export | Low-resolution, multi-style files | One style per PDF, print quality |
How long does building a tech pack take?
Expect real time, not an afternoon. Independent estimates put a professional tech pack at 5 to 20 hours of work and $500 to $2,000 per style (Guru, 2022). Your first one, built yourself, will likely land at the top of that hour range, because you're learning the process while you do it.
Most of that time isn't drawing. It's the grading, the tolerances, and the construction detail, the parts beginners rush or skip. Those three steps are where a factory either understands you or guesses. Spend your hours there.
Break the total down per step and the shape surprises people. Drawing the flat and grading the run eat the most hours, 1 to 3 each. Reference, tolerances, colorways, and export are quick, often under an hour apiece. The steps that feel creative aren't the expensive ones. The expensive ones sit in the technical middle, and that's exactly where beginners try to save time.
Frequently asked questions
Do I need a tech pack for just one hoodie?
Yes, even for one style. A tech pack is the document that carries your garment from idea to production. Without one, the factory guesses your fabric, fit, and finish, and the sample comes back wrong. One clear file beats a dozen back-and-forth emails.
What software do I need to make a tech pack?
You can build a tech pack in Adobe Illustrator plus a spreadsheet, or in dedicated tech pack software. Illustrator handles your flats and callouts; the spreadsheet handles the BOM and measurements. Beginners often start from a ready-made template so the eight sections are already structured before drawing begins.
How many sizes should I grade?
Grade the full run you plan to sell, usually XS through XL. Standardized references exist to check your increments: ASTM D5585-21 covers misses sizes 00 to 20 (ASTM). Give each point of measure its own grade rule rather than scaling everything by one flat percentage.
What tolerance is normal for a hoodie?
There's no single legal number, but tolerances are typically tighter on chest and length and looser on minor points. They tie to inspection: factories check against an Acceptable Quality Limit, with AQL 2.5 the most common general level (QIMA). Set a realistic tolerance on every point of measure.
Can I make a tech pack without design experience?
Yes. Work through the nine steps in order, start from a real reference garment, and lean on a template for structure. The parts that need care are grading and tolerances, not artistic skill. If it feels like too much, a tech pack service can build the file from your sketches.
Is making a tech pack the same as creating one?
Yes. Making a tech pack and creating a tech pack describe the same process: the nine ordered steps in this guide, from a reference garment to a factory-ready PDF. Whether you searched for how to make a tech pack or how to create a tech pack, the build is identical, and grading and tolerances are the two steps that decide whether a factory accepts it.
How much does it cost to make your own tech pack?
Building it yourself costs mostly time, not money. A spreadsheet and a vector tool can be free, or Illustrator runs on a monthly subscription. Compare that to outsourcing: independent estimates put a professional tech pack at $500 to $2,000 per style (Guru, 2022). Your real cost is the 5 to 20 hours instead.
Can I use AI to make a tech pack?
Partly. AI flat generators can rough out a front and back fast, and we've tested Adstronaut (disclosed: an AI vendor) for exactly that. What AI can't reliably do yet is grade a size run or set defensible tolerances, the two steps factories actually check. Treat AI as a first-draft tool, then correct the technical spec by hand.
What's the difference between a BOM and a cost sheet?
They're two of the eight standard sections and easy to confuse. The bill of materials lists every physical component: fabric, thread, trims, and packaging. The cost sheet takes those components, adds labor, and prices the garment. The BOM says what's in it; the cost sheet says what it costs to make.
Wrapping up
Making a tech pack isn't complicated, but it is ordered. Reference, flat, BOM, measurements, grading, tolerances, construction, labels, export. Do them in sequence and each step feeds the next cleanly. The two steps that separate a factory-ready file from a rejected sample are grading and tolerances, and they're exactly the two most beginners skip. Don't. That's where fit lives, and fit is what gets checked on the line. Start from one real hoodie, build the sections one at a time, and export one clean PDF per style. When you're ready to go deeper, the full tech pack guide has the complete reference. Your first file will be slow. Your fifth will be fast.
Peter Midea is GarmentSpec's technical lead for brand development.
We build the factory-ready spec a manufacturer can quote from without a single question: technical flats, bill of materials, graded points of measure with tolerances, colorways and construction notes. $299 per style, 3 to 5 working days, 2 to 3 revision rounds.
Get your tech pack — $299Start with the free templateWe don't take your production. The spec is yours to send to any factory, anywhere. Talk to us first if you're not sure what you need.
Sources
Every statistic and definition in this article traces to one of the following. Each is listed once here, and cited inline where it is used.
- Guru
- Pexels
- Sewport
- ASTM International
- ASTM International
- ASTM International
- QIMA
- otextilpt.sirv.com